
You can use the Web UI to manage the networking elements of MAAS, including subnets, fabrics, VLANs, and spaces. This page shows how to access and edit these elements. See Concepts and terms for the definitions of networking objects, along with a basic networking tutorial (if needed).
Ten questions you may have:
- How do I access the main networking view?
- How do I view the subnet window?
- How do I view a subnet summary?
- How do I view utilisation?
- How do I manage static routes?
- How do I manage reserved ranges?
- How do I view used addresses?
- How do I set up a bridge?
- How do I set up a bridge with the web UI?
- How do I set up a bridge with netplan?
Main networking view
To access the main networking view visit the ‘Subnets’ page:
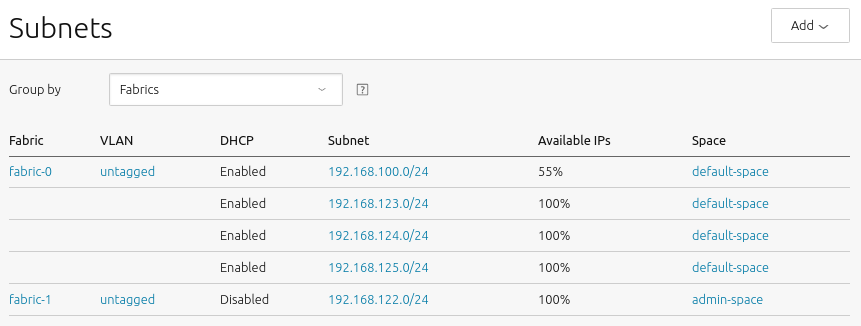
Due to the nature of this example, we re-use elements like fabrics, VLANs, subnets, and spaces. MAAS can automatically detect these elements – here there are two fabrics, one VLAN, five subnets, and two spaces – but if MAAS doesn’t find them, they can be added manually using the ‘Add’ button.
This main view can also be filtered either by fabrics or by spaces through the use of the ‘Group by’ drop-down.
Fabrics, VLANs, and spaces do not require much configuration beyond names and descriptions. You can change the MTU for a VLAN, as well as enable DHCP (see ‘Take action’ button). None of these options requires detailed instruction. A subnet, on the other hand, provides a number of configuration options relevant to the day-to-day operation of MAAS.
Subnet window
Clicking a subnet (here 192.168.100.0/24) will display its detail screen, which presents several vertical sections. Let’s take them one by one.
Subnet summary
The Subnet summary section is the largest and most complex of the subnet configuration screens:
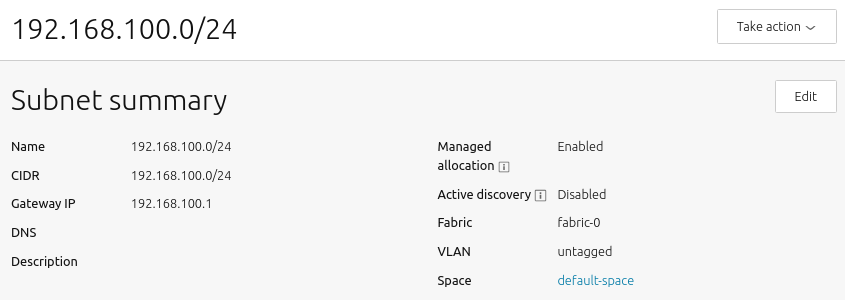
This screen presents the following configurable options:
-
Name: Subnet names can be any valid text string, although usually, and by default, they are named with the CIDR of the subnet itself.
-
CIDR: This is the address parameter for the subnet. In keeping with standard CIDR notation, the number of bits of the prefix are indicated after the slash.
-
Gateway IP: This is the address of the default gateway for your subnet, which is the IP address that transfers packets to other subnets or networks. Typically, this is simply the first IP address in a block of addresses (the
.1address). -
DNS: This is the address of a DNS (domain name server, or simply “nameserver”) for your subnet. It’s optional, but can be configured if desired.
-
Description: This field represents freeform text that you can enter to describe your subnet, as needed to keep important notes attached to the definition of the subnet.
- Managed allocation refers to the ability of MAAS to completely manage a subnet. See Subnet management.
-
Active mapping instructs MAAS to scan the subnet every 3 hours to discover hosts that have not been discovered passively.
-
Proxy access instructs MAAS to allow clients from this subnet to access the MAAS proxy.
-
Allow DNS resolution allows subnet clients to use MAAS for DNS resolution.
-
Fabric: This field allows you to set the subnet’s fabric.
-
VLAN: This field allows you to set the subnet’s VLAN.
-
Space is presented for clarity, though spaces are managed at the VLAN level.
Utilisation
This section of the subnet page presents metrics regarding address usage by this subnet.

‘Subnet addresses’ shows the total number of addresses associated with the subnet, here 254. ‘Availability’ shows how many of those addresses are unused, and therefore “available”, here 189, which corresponds to a percentage of roughly 74% of the total. Finally, ‘Used’ shows the percentage that is used, here roughly 26%.
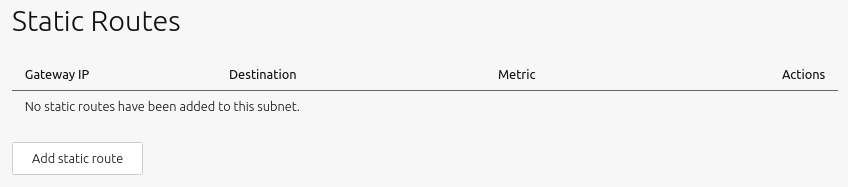
Static Routes
This section can be used to define a static route between two subnets. A route is defined on a per-subnet basis to use a particular gateway, using a configured destination and metric.
To create a static route, click the ‘Add static route’ button to reveal the edit pane. Enter a Gateway IP address, select a destination subnet from the ‘Destination’ drop-down list, and edit the routing metric value if needed. Clicking ‘Add’ will activate the route. Routes can be edited and removed using the icons to the right of each entry.
Reserved ranges
The reserved ranges section of the subnet screen looks like this:
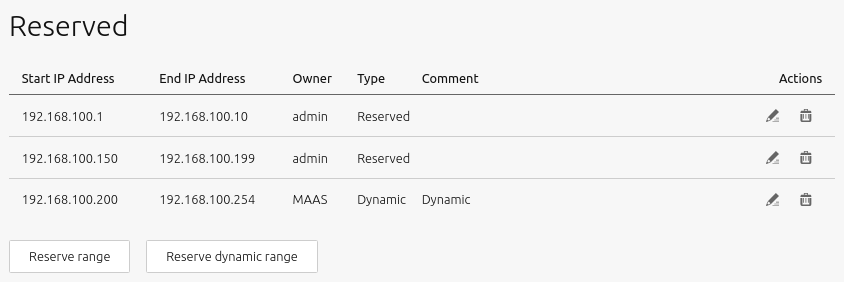
This subject is treated separately in IP ranges.
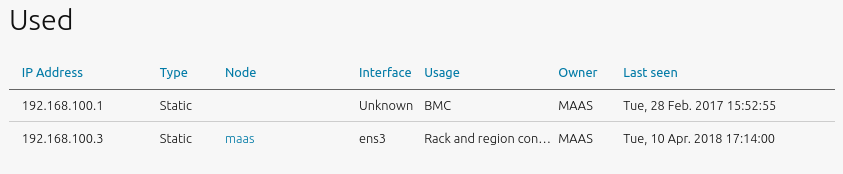
Used
This section displays hosts (including controllers) associated with the used addresses along with related bits of host information.
Setting up a bridge
At various times in your MAAS network, you may need to set up a bridge to connect between your machines and MAAS. This section explains several ways of accomplishing this.
It’s essential to enforce usage of IP addresses to avoid domain name conflicts, should different controllers resolve the same domain name with different IP addresses. You should also avoid using 127.0.0.1 when running multiple controllers, as it would confuse MAAS.
Set up a bridge with MAAS UI
You can use the MAAS UI to configure a bridge. Select the machine you want to bridge and switch to the “Network” tab. Select the network where you want to create the bridge and click “Create bridge:”

Configure the bridge on a subnet MAAS controls. You may use any IP mode for the bridge:

When you’re done, it should look something like this:

Then you can deploy using the bridge.
Use netplan to configure a bridge
You can also use netplan to configure a bridge:
Open your netplan configuration file. This should be in /etc/netplan. It could be called 50-cloud-init.yaml, netplan.yaml, or something else. Modify the file to add a bridge, using the example below to guide you:
network:
    bridges:
        br0:
            addresses:
            - 10.0.0.101/24
            gateway4: 10.0.0.1
            interfaces:
            - enp1s0
            macaddress: 52:54:00:39:9d:f9
            mtu: 1500
            nameservers:
                addresses:
                - 10.0.0.2
                search:
                - maas
            parameters:
                forward-delay: 15
                stp: false
    ethernets:
        enp1s0:
            match:
                macaddress: 52:54:00:39:9d:f9
            mtu: 1500
            set-name: enp1s0
        enp2s0:
            match:
                macaddress: 52:54:00:df:87:ac
            mtu: 1500
            set-name: enp2s0
        enp3s0:
            match:
                macaddress: 52:54:00:a7:ac:46
            mtu: 1500
            set-name: enp3s0
    version: 2
Apply the new configuration with netplan apply.