How to commission a machine
To commission a machine:
-
Go to the “Machines” page.
-
Select the machine(s) you want to commission.
-
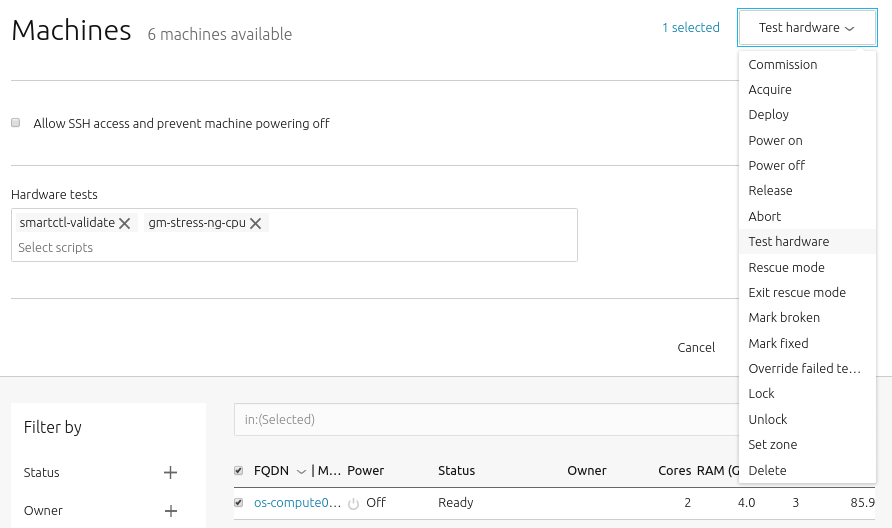
Choose “Commission” under the “Take action” drop-down menu:
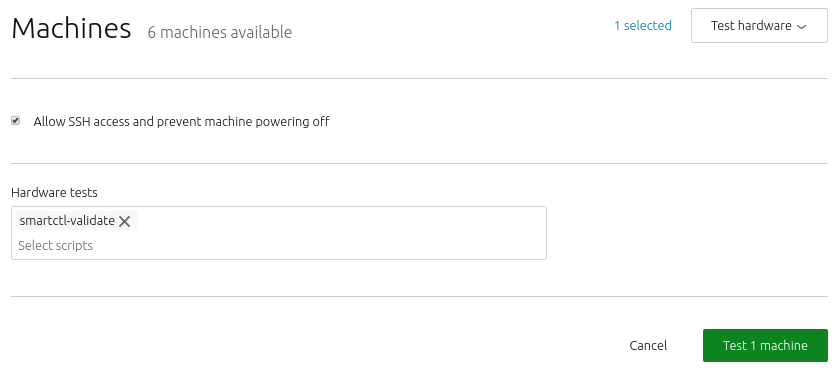
You have the option of selecting some extra parameters (checkboxes) and performing hardware tests.
These options include:
-
Allow SSH access and prevent machine powering off: Machines are normally powered off after commissioning. This option keeps the machine on and enables SSH so you can access the machine.
-
Retain network configuration: When enabled, preserves any custom network settings previously configured for the machine. See Networking for more information.
-
Retain storage configuration: When enabled, preserves any storage settings previously configured for the machine. See Storage for more details.
-
Update firmware: Runs scripts tagged with
update_firmware. -
Configure HBA: Runs scripts tagged with
configure_hba.
-
Click the Hardware tests field to reveal a drop-down list of tests to add and run during commissioning. See Hardware testing for more information on hardware testing scripts.
-
Finalise the directive by hitting “Commission machine”.
While commissioning, the machine status will change to reflect this state (Commissioning). MAAS discovers the machine’s network topology. MAAS then prompts a machine network interface to connect to the fabric, VLAN, and subnet combination for configuration. Usually, MAAS assigns a static IP address out of the reserved IP range for the subnet (“Auto assign” mode). The next section details several assignment modes.
Once commissioned, a machine’s status will change to Ready, and an extra tab for the machine called “Commissioning” will become available. This tab contains the results of the scripts executed during the commissioning process.
Once commissioned, you may consider creating or applying a tag to this machine. The next step is deployment.
How to manage commissioning and testing scripts
This section explains:
- How to download built-in scripts
- How to upload scripts
- How to debug script failures
- How to locate script files
- How to locate log files
- How to run all scripts manually
You can also refer to technical details and examples for commissioning scripts and testing scripts as needed.
How to download built-in scripts
You can download the source for all commissioning and test scripts via the API with the following command:
maas $PROFILE node-script download $SCRIPT_NAME
The source code to all built-in scripts is available on launchpad.
How to upload scripts
Scripts can be uploaded to MAAS using the web UI. Select the ‘User scripts’ tab of the ‘Settings’ page - the ‘Commissioning scripts’ section is near the top. Within the Commissioning scripts section, click the Upload script button followed by ‘Choose file’ to open a requester, locate the script, and select Upload to upload it to MAAS.
A status message of Commissioning script created will appear. You’ll then be able to select your script after selecting Test hardware from a machine’s ‘Take action’ menu.
MAAS executes scripts in lexicographical order. This order allows you to control when your scripts execute, and whether they run before or after the standard MAAS scripts.
How to debug script failures
Clicking on the title of a completed or failed script will reveal the output from that specific script.
If you need further details, especially when writing and running your own scripts, you can connect to a machine and examine its logs and environment.
To do this, enable Allow SSH access and prevent the machine from powering off when selecting ‘Test hardware’ from the machine ‘Take action’ menu.
Because scripts operate within an ephemeral version of Ubuntu, enabling this option stops the machine from shutting down, allowing you to connect and probe a script’s status.
As long as you’ve added your SSH key to MAAS, you can connect with SSH to the machine’s IP with a username of ubuntu. Type sudo -i to get root access.
How to locate script files
Commissioning and testing script files may be found in the following directories:
-
/tmp/user_data.sh.*/scripts/commissioning/: Commissioning scripts -
/tmp/user_data.sh.*/scripts/testing/: Hardware testing scripts
How to locate log files
Commissioning and testing log files may be found in the following directories:
/tmp/user_data.sh*/out//var/log/cloud-init-output.log/var/log/cloud-init.log
How to run all scripts manually
You can also run all commissioning and hardware-testing scripts on a machine for debugging.
/tmp/user_data.sh.*/bin/maas-run-remote-scripts \
    [--no-download] \
    [--no-send] \
    /tmp/user_data.sh.*
Where:
-
--no-download: Optional. Do not download the scripts from MAAS again. -
--no-send: Optional. Do not send the results to MAAS.
For example, to run all the scripts again without downloading again from MAAS:
/tmp/user_data.sh.*/bin/maas-run-remote-scripts --no-download /tmp/user_data.sh.*
Here, all the scripts are run again after downloading from MAAS, but no output data is sent to MAAS:
/tmp/user_data.sh.*/bin/maas-run-remote-scripts --no-send /tmp/user_data.sh.*


