
You can easily manage the basic networking elements of MAAS, including subnets, fabrics, VLANs, spaces, and IP ranges. This section shows how to access and edit these elements. See Concepts and terms for the definitions of these networking components.
This section will show you:
- How to enable network discovery
- How to toggle subnet management
- How to access the main networking view
- How to display the subnet window
- How to view the subnet summary
- How to view utilisation
- How to manage static routes between subnets
- How to view reserved ranges
- How to view used IP addresses
- How to set up a bridge with MAAS
- How to set up a bridge with netplan
- How to enable network discovery
- How to toggle subnet management
- How to determine fabric ID
- How to set a default gateway
- How to set a DNS server
- How to list available subnets
- How to view subnet details
- How to manage static routes between subnets
- How to set up a bridge with MAAS
- How to set up a bridge with netplan
How to enable network discovery
Network discovery can be disabled or re-enabled using the switch on the Network discovery dashboard.
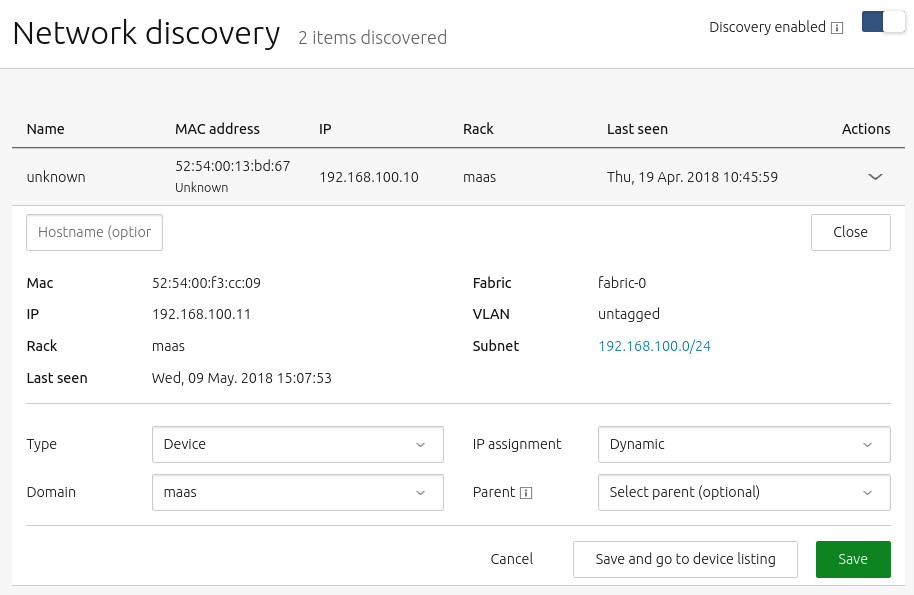
To enable network discovery, enter the following at the command line:
maas $PROFILE maas set-config name=network_discovery value="enabled"
If successful, you should receive output similar to:
Success.
Machine-readable output follows:
OK
Network discovery can be disabled or re-enabled at any time with this CLI command.
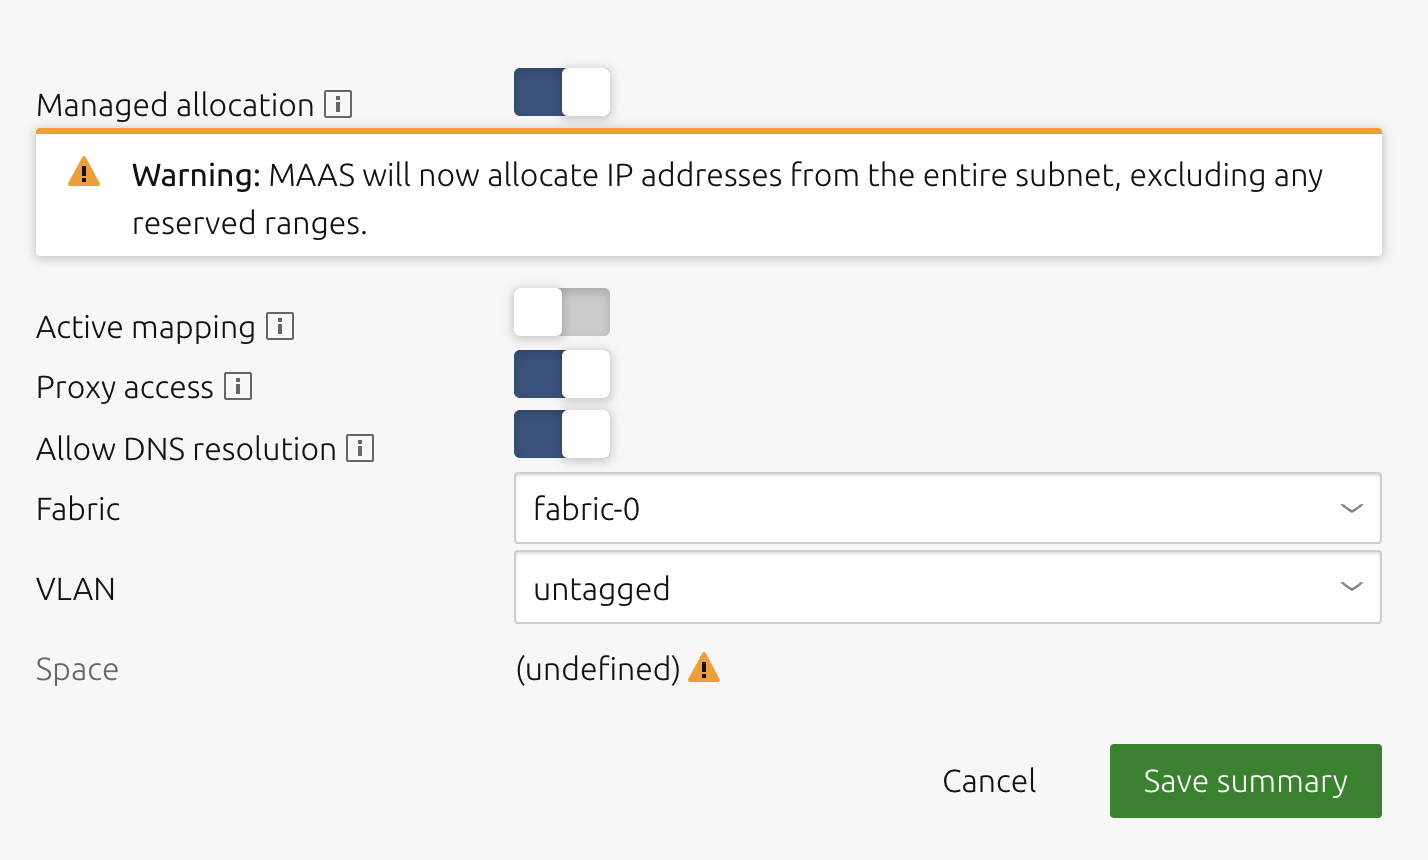
How to toggle subnet management
To disable (or re-enable) subnet management, use the following procedure:
-
Navigate to the ‘Subnets’ page and select the subnet.
-
Press the ‘Edit’ button to allow changes; the ‘Managed allocation’ field will become a slide switch.
-
Click the label (or the switch icon itself) to toggle between enabled (dark blue) and disabled (grey).
-
Click ‘Save summary’.
The following screenshot illustrates this process.
How to access the main networking view
To access the main networking view visit the ‘Subnets’ page:
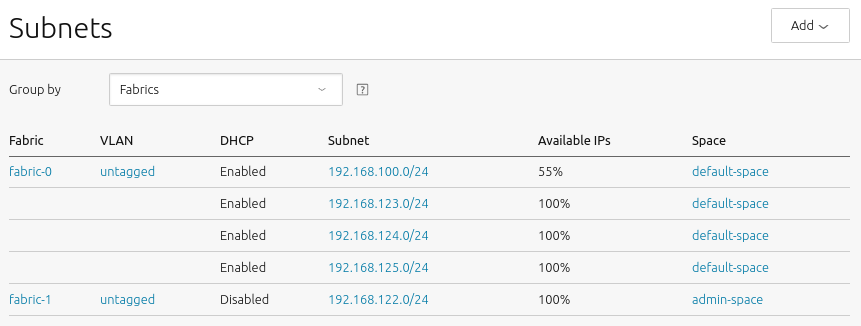
This main view can also be filtered either by fabrics or by spaces through the use of the ‘Group by’ drop-down.
To enable or disable subnet management:
maas $PROFILE subnet update $SUBNET_CIDR managed=false|true
For example, to disable subnet management:
maas $PROFILE subnet update 192.168.1.0/24 managed=false
You can use the subnets ID in place of the CIDR address.
How to determine fabric ID
To determine a fabric ID based on a subnet address:
FABRIC_ID=$(maas $PROFILE subnet read $SUBNET_CIDR \
    | grep fabric | cut -d ' ' -f 10 | cut -d '"' -f 2)
This may come in handy when you need a fabric ID for other CLI calls.
How to set a default gateway
To set the default gateway for a subnet:
maas $PROFILE subnet update $SUBNET_CIDR gateway_ip=$MY_GATEWAY
How to set a DNS server
To set the DNS server for a subnet:
maas $PROFILE subnet update $SUBNET_CIDR dns_servers=$MY_NAME SERVER
How to list available subnets
To view the list of available subnets, enter the following command:
maas admin subnets read | \
jq -r '(["FABRIC", "VLAN", "DHCP", "SUBNET"]
| (., map(length*"-"))),
(.[] | [.vlan.fabric, .vlan.name, .vlan.dhcp_on, .cidr])
| @tsv' \
| column -t
which produces output something like this:
FABRIC        VLAN      DHCP       SUBNET
------        ----      ---------  ------
Patient-Care  untagged  true       192.168.123.0/24
fabric-0      untagged  false      0.0.0.0/0
fabric-0      untagged  false      10.0.0.0/24
fabric-1      untagged  false      10.70.132.0/24
fabric-1      untagged  false      fd42:8b52:7114:9ef8::/64
fabric-3      untagged  true       192.168.43.0/24
fabric-3      untagged  true       2600:100d:b125:d5e9::/64
fabric-3      untagged  true       2600:100d:b120:3933::/64
fabric-3      untagged  true       2600:100d:b109:dee0::/64
fabric-3      untagged  true       2600:100d:b104:94c0::/64
How to display the subnet window
Clicking a subnet (here 192.168.100.0/24) will display its detail screen, which contains several sections, described below.
How to view the subnet summary
The Subnet summary section is the largest and most complex of the subnet configuration screens:
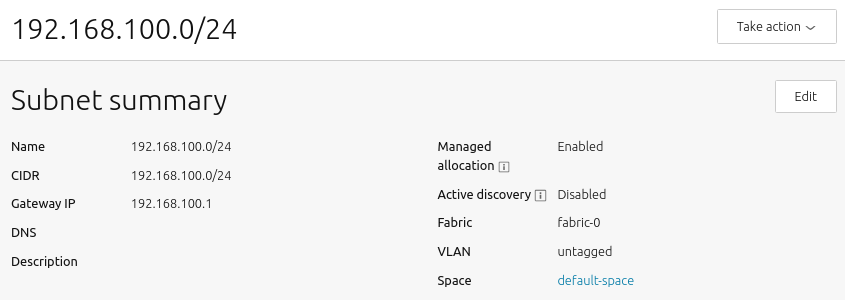
This screen presents the following configurable options:
-
Name: Subnet names can be any valid text string. By default, they are named with the CIDR of the subnet itself.
-
CIDR: This is the address parameter for the subnet. In keeping with standard CIDR notation, the number of bits of the prefix are indicated after the slash.
-
Gateway IP: This is the address of the default gateway for your subnet, which is the IP address that transfers packets to other subnets or networks. Typically, this is simply the first IP address in a block of addresses (the
.1address). -
DNS: This is the address of a DNS (domain name server, or simply “name server”) for your subnet. It’s optional, but can be configured if desired.
-
Description: This field represents free form text that you can enter to describe your subnet, as needed to keep important notes attached to the definition of the subnet.
-
Managed allocation refers to the ability of MAAS to completely manage a subnet.
-
Active mapping instructs MAAS to scan the subnet every 3 hours to discover hosts that have not been discovered passively.
-
Proxy access instructs MAAS to allow clients from this subnet to access the MAAS proxy.
-
Allow DNS resolution allows subnet clients to use MAAS for DNS resolution.
-
Fabric: This field allows you to set the subnets fabric.
-
VLAN: This field allows you to set the subnets VLAN.
-
Space is presented for clarity, though spaces are managed at the VLAN level.
How to view utilisation
This section of the subnet page presents metrics regarding address usage by this subnet.

‘Subnet addresses’ shows the total number of addresses associated with the subnet, here 254. ‘Availability’ shows how many of those addresses are unused, and therefore “available”, here 189, which corresponds to a percentage of roughly 74% of the total. Finally, ‘Used’ shows the percentage that is used, here roughly 26%.
How to view subnet details
You can view the details of an individual subnet with the command:
maas $PROFILE subnet read $SUBNET_ID \
| jq -r '(["NAME","CIDR","GATEWAY","DNS","DISCOVERY","FABRIC","VLAN"]
| (., map(length*"-"))), ([.name,.cidr,.gateway_ip // "-", .allow_dns,.active_discovery,.vlan.name,.vlan.fabric]) | @tsv' | column -t
This command retrieves output similar to this:
NAME              CIDR              GATEWAY  DNS   DISCOVERY  FABRIC    VLAN
----              ----              -------  ---   ---------  ------    ----
192.168.123.0/24  192.168.123.0/24  -        true  false      untagged  default
If you don’t know the subnet ID, you can look it up like this:
maas $PROFILE subnets read \
| jq -r '(["NAME", "SUBNET_ID"]
| (., map(length*"-"))), (.[] | [.name, .id]) | @tsv' \
| column -t | grep $SUBNET_NAME
For example, if you’re using the “admin” profile, and your subnet name contains “192.168.123,” you could find the subnet ID with this command:
maas admin subnets read \
| jq -r '(["NAME", "SUBNET_ID"]
| (., map(length*"-"))), (.[] | [.name, .id]) | @tsv' \
| column -t | grep 192.168.123
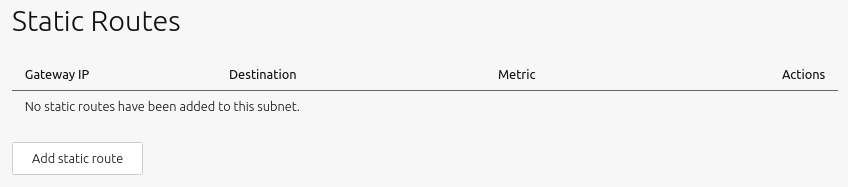
How to manage static routes between subnets
To create a static route:
-
Click the ‘Add static route’ button to reveal the edit pane.
-
Enter a Gateway IP address.
-
Select a destination subnet from the ‘Destination’ drop-down list.
-
Edit the routing metric value if needed.
-
Click ‘Add’ to activate the route.
Routes can be edited and removed using the icons to the right of each entry.
To create a static route between two subnets, use the following command:
maas admin static-routes create source=$SOURCE_SUBNET destination=$DEST_SUBNET \
gateway_ip=$GATEWAY_IP
How to view reserved ranges
The reserved ranges section of the subnet screen looks like this:
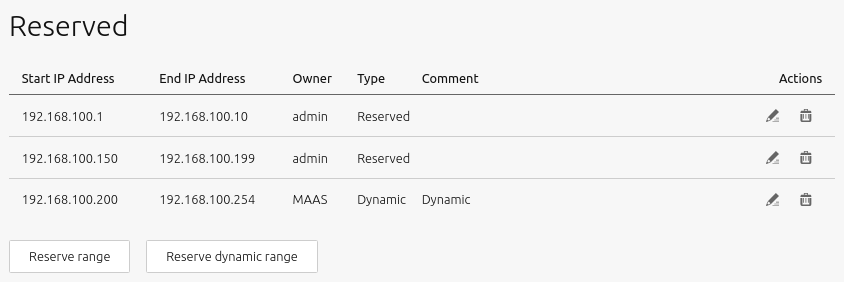
More details and instructions regarding these ranges can be found in IP ranges.
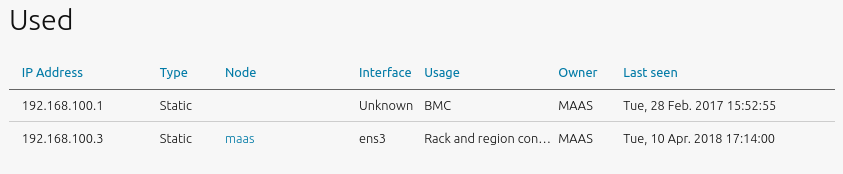
How to view used IP addresses
This section displays hosts (including controllers) associated with the used addresses along with related bits of host information.
How to set up a bridge with MAAS
At various times in your MAAS network, you may need to set up a bridge to connect between your machines and MAAS, as shown in this section.
It’s essential to enforce usage of IP addresses to avoid domain name conflicts, should different controllers resolve the same domain name with different IP addresses. You should also avoid using 127.0.0.1 when running multiple controllers, as it would confuse MAAS.
To configure a bridge with the MAAS UI:
-
Select the machine you want to bridge.
-
Switch to the “Network” tab.
-
Select the network where you want to create the bridge and click “Create bridge:”

- Configure the bridge on a subnet MAAS controls (you may use any IP mode for the bridge):

When you’re done, it should look something like this:

Then you can deploy machines using this bridge.
NOTE that you can create an “Open switch” bridge if desired, and MAAS will create the netplan model for you.
You can use the MAAS CLI/API to configure a bridge via the following procedure:
-
Select the interface on which you wish to configure the bridge. This example uses the boot interface, since the boot interface must be connected to a MAAS controlled network – but any interface is allowed:
INTERFACE_ID=$(maas $PROFILE machine read $SYSTEM_ID | jq .boot_interface.id) -
Create the bridge:
BRIDGE_ID=$(maas $PROFILE interfaces create-bridge $SYSTEM_ID name=br0 parent=$INTERFACE_ID | jq .id) -
Select the subnet where you want the bridge (this should be a MAAS controlled subnet):
SUBNET_ID=$(maas $PROFILE subnets read | jq -r '.[] | select(.cidr == "10.0.0.0/24" and .managed == true).id') -
Connect the bridge to the subnet:
maas $PROFILE interface link-subnet $SYSTEM_ID $BRIDGE_ID subnet=$SUBNET_ID mode="STATIC" ip_address="10.0.0.101"
How to set up a bridge with netplan
You can also use netplan to configure a bridge:
-
Open your netplan configuration file. This should be in
/etc/netplan. It could be called50-cloud-init.yaml,netplan.yaml, or something else. -
Modify the file to add a bridge, using the following example as a guide:
network:
    bridges:
        br0:
            addresses:
            - 10.0.0.101/24
            gateway4: 10.0.0.1
            interfaces:
            - enp1s0
            mac address: 52:54:00:39:9d:f9
            mtu: 1500
            name servers:
                addresses:
                - 10.0.0.2
                search:
                - maas
            parameters:
                forward-delay: 15
                stp: false
    Ethernet's:
        enp1s0:
            match:
                mac address: 52:54:00:39:9d:f9
            mtu: 1500
            set-name: enp1s0
        enp2s0:
            match:
                mac address: 52:54:00:df:87:ac
            mtu: 1500
            set-name: enp2s0
        enp3s0:
            match:
                mac address: 52:54:00:a7:ac:46
            mtu: 1500
            set-name: enp3s0
    version: 2
- Apply the new configuration with
netplan apply.