Build a MAAS and LXD environment in 30 minutes with Multipass on Ubuntu

Overview

Time to try MAAS. We wanted to make it easier to go hands-on with MAAS, so we created this tutorial to enable people to do that, right on their own PC or laptop. Below, we’ll explain how MAAS works and then dive straight into building a complete test environment using Multipass, MAAS, and LXD.

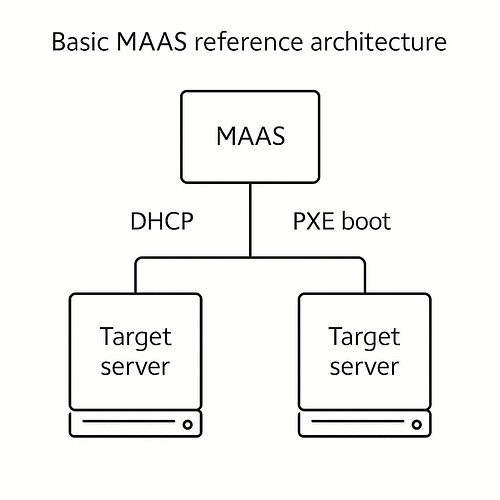
MAAS works by detecting servers that attempt to boot via a network (PXE booting). This means MAAS needs to be on the same network as the servers it will manage. At home or in an office, this can create conflicts with existing DHCP infrastructure, so we use a fully self-contained virtual setup instead.

A potential MAAS test setup

One way to try MAAS is to have a separate network with a switch, router, and several servers. One runs MAAS, the rest are targets for provisioning. In this tutorial, we automate all of this in a virtual machine with Multipass and use LXD to simulate machines MAAS can control. The setup looks something like this:

1. Setting up Multipass and launching the VM

Multipass is a Canonical tool that simplifies the creation of virtual machines. This tutorial uses Multipass to build a self-contained VM that hosts both MAAS and an LXD environment.

Requirements:

  • Ubuntu 18.04 LTS or higher, or Windows with Hyper-V
  • 16 GB RAM, 4-core CPU with virtualization support (VT or AMD-V)
  • 30 GB free disk space

Install and verify Multipass:

sudo snap install multipass
multipass launch --name foo
multipass exec foo -- lsb_release -a
multipass delete --purge foo

Check for virtualization support:

sudo apt install cpu-checker
kvm-ok

Output should include:

INFO: /dev/kvm exists
KVM acceleration can be used

Launch the MAAS + LXD VM:

wget -qO- https://raw.githubusercontent.com/canonical/maas-multipass/main/maas.yml \
  | multipass launch --name maas -c4 -m8GB -d32GB --cloud-init -

Confirm launch:

multipass list

Two IP addresses should be visible. One is internal (10.10.10.1), used by MAAS and LXD, and the other is for accessing MAAS from your host.

2. Installing and configuring MAAS within the VM

Visit MAAS in your browser:

http://<MAAS_IP>:5240/MAAS

Login credentials:

  • Username: admin
  • Password: admin

Walkthrough steps:

  • Confirm or set DNS (default: 8.8.8.8)
  • Continue past boot image import message (MAAS handles it automatically)
  • Skip SSH key screen (already set up in VM)

Verification in MAAS UI:

  • KVM > LXD: confirms the LXD host is available
  • Controllers: both rack and region controllers visible with green status
  • Images: wait for them to sync (1 GB+ download)

3. Setting up LXD and creating virtual machines

Once the MAAS setup is verified:

Create a nested VM guest:

  • Navigate to KVM > LXD > Select host > Add VM
  • Fill in:
    • Hostname: AwesomeVM1
    • RAM: 8000 MiB
    • Storage: 8000 MiB
    • CPU: 2 cores
  • Click Compose machine

The VM will show in the Machines tab and automatically begin commissioning.

4. Commissioning and deploying machines using MAAS

Commission the VM:

  • Monitor status in Machines tab → “Commissioning” → “Ready”

Deploy Ubuntu:

  • Select machine → Actions > Deploy

Confirm deployment:

multipass shell maas
ping <AwesomeVM1_IP>
ssh ubuntu@<AwesomeVM1_IP>
ping ubuntu.com

This confirms successful deployment and internet access.

Summary

In this tutorial, we:

  • Installed Multipass and launched a nested MAAS VM
  • Set up and configured MAAS via browser UI
  • Created nested LXD VMs
  • Commissioned and deployed Ubuntu to them with MAAS
  • Verified VM guest functionality via SSH and ping

Next steps

Explore editing the maas.yml file to fine-tune VM parameters. You can also expand this setup to a real physical environment or explore more advanced features of MAAS like tagging, scripts, and custom commissioning flows.

You may also want to try using a local copy of MAAS with real hardware, which is a much simpler architecture:

If you’re brave, you can try that in your homelab, with some simple, off-the-shelf NUCs or mini-PCs, using the instructions found in this GitHub repository.

Learn more at: https://maas.io

1 Like
  1. AwesomeVM1’ does not conform to the hostname naming convention, and an error will be thrown:‘cannot set hostname “AwesomeVM1”: name not valid ’。Please modify the ‘AwesomeVM1’ in the document to a usable value, for example: awesomevm1。
  2. Maas3.1 cannot use the LXD mode normally, because after the deployment is completed, when creating a VM on the KVM page, there is no ‘Architecture’ to choose from. Modify ‘snap install maas’ in maas.yml to ‘snap install --channel=3.0/stable maas’ and there is no such issue.
1 Like

Thanks for bringing this to my attention.

#2 looks like a bug and I’ve filed it here: https://bugs.launchpad.net/maas/+bug/1955912
I’ve also changed the tutorial repo so that it sets the MAAS version to 3.0 for now as per your suggestion.

#1 may also be a bug but I will come back.

Again, thank you for highlighting this!

Nice Tutorial. However, with the latest versions of MAAS 3.1 and LXD 4.22. It is not able to commission any KVM composed machines.

Following the tutorial step-by-step everything seems to be fine up until the step “Create VM Guest”. The screen shot you have differs from what is seen in the current version, clicking on “Add Virtual Machine” gets me to composing the machine. Composing Machine also works as per your description.

The machine composition happens but commissioning fails with a lot of errors (Most of the commissioning scripts fail). There is also a power error. Commissioning scripts also are trying to run BMC scripts. I do not understand why maas does not recognize that the composed machine is virtual.

If you have seen this behavior or if you have suggestions on what to look for it would be greatly appreciated.

Thank You

Hi - sorry yes there are some issues with maas 3.1 and lxd. For now I’ve reverted the tutorial to use maas 3.0 (again), so you can take the latest cloud init file and make a new multipass VM and things should be fine.

@xsyourpal could you attach a screenshot of the commissioning tab for the machine as well as the output/error for failing scripts?

The failure happens even when following the Tutorial exactly as shown. This is using the configuration provided in the tutorial, so maas version is 3.0

Thank You for your help.

I am only allowed to upload one screenshot at a time. Therefore 2 reply’s to your request

I did revert to following your tutorial exactly. The commissioning errors happen even then, so it is not related to maas version per se. The screenshots I have provided are with using multipass with its standard local.driver qemu

I also tried following the tutorial by changing the multipass local.driver to lxd on my bare metal host. That approach also did not work, however the error in that case was:
“Error:Pod unable to compose machine: Unable to compose machine because: Failed talking to pod: Failed creating instance record: Instance type “virtual-machine” is not supported on this server”

Thank you for your help.

could you paste the output of lxc info <machine-name> --show-log for that VM?

Sorry, I meant lxc info --show-log vm01 from the MAAS machine, to get the info about the VM that’s failing commissioning

The command lxc info vm01 --show-log returns Error: Not Found. So does not seem vm01 instance was even created.
I have tried this tutorial on two different systems (both ubuntu 20.04) and both of them give the same error.

The Logs from the Commissioning action after composing shows the following:

what host are you using? are you running this on an ubuntu machine?

I just re-tested it on a fresh ubuntu 21.04 host and it worked ok.

Note, the tutorial relies on nested VMs, so if you are running your ubuntu host itself in a VM, that might cause issues.

I.e. Multipass creates a new VM, and inside that the tutorial uses LXD to create more VMs. If you are already inside a VM for your host, then that is 3 layers, and we have not verified the tutorial in that scenario.

I ran the tutorial using the yaml that you have provided so that the setup matches yours. I ran on two bare metal machines, one is a server class and one workstation both running Ubuntu 20.04.

I just tried to run the tutorial again on another machine and I see the same error. Details of that system are as follows:

Hardware: Intel NUC Intel® Core™ i5-4250U CPU @ 1.30GHz
OS: Linux nuc 5.13.0-27-generic #29~20.04.1-Ubuntu SMP Fri Jan 14 00:32:30 UTC 2022 x86_64 x86_64 x86_64 GNU/Linux

This command:
wget -qO- https://raw.githubusercontent.com/canonical/maas-multipass/main/maas.yml
| multipass launch --name maas -c4 -m8GB -d32GB --cloud-init -

sets everything up nicely and I see nothing that would indicate a departure from what you have shown in your tutorial. Composing the virtual machine seems to kick off fine, with resource allocation properly accounted for, the deviation is in the failed commissioning where it seems to try to use the power scripts like it was real hardware. I am following tutorial steps closely. As I mentioned above, my systems have Ubuntu 20.04 fully updated.

I believe, the nesting is baremetal-Multipass-VM (maas)–Composed VM (so two levels)

Having tried it a few times, I believe this tutorial does not seem work on Ubuntu 20.04.1 systems unless some other user has had a different experience. I do not have a system to do a fresh 21.04 install and try run the tutorial at the moment

Thank You for helping on this.

Hi, I went back and tested again and made sure my host was 20.04 and it worked for me, including deploying a VM. I did edit my yaml file to change to maas 3.1 and to use a new LXD version.

It looked like this. Note the LXD snap refresh, which will make sure it’s using a new LXD. However, this should not make any difference really, as I also tested without these changes and it worked fine. I’m a bit stuck understanding what’s going wrong for you.

    snap:
      commands:
        - snap install maas
    #    - snap install --channel=3.0/stable maas
        - snap install --channel=latest/stable lxd
        - snap refresh --channel=latest/stable lxd
        - snap install maas-test-db

Thank You for taking the time to investigate this issue.
Unfortunately all my efforts result in the same error on commissioning.

In the Multipass VM, I have:

core18 20211215 2284 latest/stable canonical✓ base
core20 20220114 1328 latest/stable canonical✓ base
lxd 4.22 22340 latest/stable canonical✓ -
maas 3.0.0-10029-g.986ea3e45 18309 3.0/stable canonical✓ -
maas-cli 0.6.5 13 latest/stable canonical✓ -
maas-test-db 12.4-17-g.9e70484 54 3.0/stable canonical✓ -
snapd 2.54.2 14549 latest/stable canonical✓ snapd

In the maas.yaml, the following lines…trying to install maas both ways, one of them matches what you have (both methods of installing maas result in the same error)

commands:
# - snap install maas
- snap install --channel=3.0/stable maas
- snap install --channel=latest/stable lxd
- snap refresh --channel=latest/stable lxd
- snap install maas-test-db

Switching the lines:
snap install maas
# snap install --channel=3.0/stable maas
does not help since it then install maas 3.1 and that also results in commissioning error.

It is a very nice tutorial. Just seems very sensitive to having precise environment for it to work.

Thank You

Hi,
I got the same error message than you on another tutorial, I realised it was because I forgot to activate the virtualisation on the BIOS…

Did you do this test:

After enabling CPU virtualisation it works fine for me.

3 Likes

Hello

What does this mean:

" If you want to get a bit more advanced, you can try editing the maas.yml file and altering how much storage LXD assigns."

I understand maas.yml is used when creating maas VM via multiboot, aren’t lxd specifics done from inside maas WebUI? Is there a separate yml file for lxd?