
Machines are the heart of MAAS. They are the backbone of your data centre application(s), providing the functions that are relevant to your customers. MAAS manages their transit through a life-cycle, from adding and enlistment, through commissioning, allocation, and deployment, finally being released back to the pool, or retired altogether. You can move them around, create redundant versions (even in other geographies you can access), and basically rearrange them to the extent that your network allows.
In this article, you will learn:
About the machine life-cycle
One of the most important things to understand about machines is their life-cycle. Machines can be discovered or added, commissioned by MAAS, acquired, deployed, released, marked broken, tested, put into rescue mode, and deleted. In addition, pools, zones, and tags can be set for machines.
About enlisting deployed machines
In addition, already-deployed machines can be enlisted by MAAS, via the MAAS 3.1 CLI, and their operating parameters can be gathered with a special MAAS script. Because already-deployed machines were not deployed by MAAS, most of the standard MAAS commands will not affect the machine and may, at times, return some odd results. This is not errant behaviour; the goal of enlisting deployed machines is to avoid disturbing their workload. These unusual behaviours will be documented throughout this article and the following machine articles.
MAAS version 3.0 cannot enlist deployed machines. Please upgrade to MAAS version 3.1 or greater to gain this capability.
MAAS version 2.9 cannot enlist deployed machines. Please upgrade to MAAS version 3.1 or greater to gain this capability.
All of these states and actions represent the possible life-cycle of a machine. This life-cycle isn’t strict or linear – it depends on how you use a machine – but it’s useful to give a general overview of how machines tend to change states. In the discussion that follows, states and actions are shown in bold type.
-
Machines start as servers in your environment, attached to a network or subnet MAAS can manage.
-
If machines are configured to netboot, MAAS can discover them and present them to you for possible commissioning, changing their state to New.
-
When you select a machine that is marked New, you can choose to commission it. If you add a machine manually, it is automatically commissioned.
-
Machines that have successfully commissioned can be acquired and deployed. Machines that don’t successfully commission can be marked broken (and later recovered when the issues are resolved).
-
Resolving problems with machines usually involve testing the machine.
-
Once you’ve deployed a machine, and you’re done with it, you can release it.
-
You can place a machine in rescue mode, which allows you to SSH to a machine to make configuration changes or do other maintenance. Once you’re done, you can exit rescue mode*.
-
Any time a machine is on, you have the option to select it and power off that machine.
-
You can abort any operation that’s in progress.
-
You also have the option to set tags, availability zone, or resource pool at various stages along the way.
Since these actions are not necessarily sequential, and the available actions change as the machine state changes, it’s not very useful to make a state diagram or flowchart. Instead, consider the following table:
| Action/State | New | Ready | Acquired | Deployed | Locked | Rescue | Broken | Enlist deployed |
|---|---|---|---|---|---|---|---|---|
| Commission | X | X | X | X (w/scripts) | ||||
| Acquire | X | |||||||
| Deploy | X | X | ||||||
| Release | X | X | X (no return) | |||||
| Power on | X | X | ||||||
| Power off | ||||||||
| Test | X | X | X | X | X | |||
| Rescue mode | X | X | X | X | X | |||
| Exit rescue | X | |||||||
| Mark broken | X | X | X (no return) | |||||
| Mark fixed | X | |||||||
| Lock | X | X | ||||||
| Unlock | X | X | ||||||
| Tag | X | X | X | X | X | X | X | |
| Set zone | X | X | X | X | X | X | X | |
| Set…pool | X | X | X | X | X | X | X | |
| Delete | X | X | X | X | X | X | X* |
*Machine is removed from the view of MAAS, but remains deployed with original workload.
| Action/State | New | Ready | Acquired | Deployed | Locked | Rescue | Broken |
|---|---|---|---|---|---|---|---|
| Commission | X | X | X | ||||
| Acquire | X | ||||||
| Deploy | X | X | |||||
| Release | X | X | |||||
| Power on | X | X | |||||
| Power off | |||||||
| Test | X | X | X | X | X | ||
| Rescue mode | X | X | X | X | X | ||
| Exit rescue | X | ||||||
| Mark broken | X | X | |||||
| Mark fixed | X | ||||||
| Lock | X | ||||||
| Unlock | X | ||||||
| Tag | X | X | X | X | X | X | |
| Set zone | X | X | X | X | X | X | |
| Set…pool | X | X | X | X | X | X | |
| Delete | X | X | X | X | X | X |
When a machine is in the state listed in a column, it is possible to take the row actions marked with an “X.”
You access these actions from the “Take action” menu in the upper right corner of the machine listing. Note that some actions, such as “Mark broken” or “Lock,” may be hidden when they are not available.
In the case of already-deployed machines enlisted by MAAS, some of the possible actions may appear to be available, but either don’t work or ultimately appear to fail, without affecting the actual status of the deployed machine.
You access these actions from the “Take action” menu in the upper right corner of the machine listing. Note that some actions, such as “Mark broken” or “Lock,” may be hidden when they are not available.
You can change machine state, via the CLI, with the machine command, which offers the following options:
$ maas admin machine -h
usage: maas admin machine [-h] COMMAND ...

Manage an individual machine.

optional arguments:
  -h, --help            show this help message and exit

drill down:
  COMMAND
    details             Get system details
    power-parameters    Get power parameters
    set-workload-annotations
			Set key=value data
    set-owner-data      Deprecated, use set-workload-annotations.
    query-power-state   Get the power state of a node
    power-on            Turn on a node
    power-off           Power off a node
    test                Begin testing process for a node
    override-failed-testing
			Ignore failed tests
    abort               Abort a node operation
    deploy              Deploy a machine
    release             Release a machine
    commission          Commission a machine
    set-storage-layout  Change storage layout
    mount-special       Mount a special-purpose filesystem
    unmount-special     Unmount a special-purpose filesystem
    clear-default-gateways
			Clear set default gateways
    get-curtin-config   Get curtin configuration
    restore-networking-configuration
			Restore networking options
    restore-storage-configuration
			Restore storage configuration
    restore-default-configuration
			Restore default configuration
    mark-broken         Mark a machine as Broken
    mark-fixed          Mark a machine as Fixed
    rescue-mode         Enter rescue mode
    exit-rescue-mode    Exit rescue mode
    lock                Lock a machine
    unlock              Unlock a machine
    read                Read a node
    update              Update a machine
    delete              Delete a machine

A machine is identified by its system_id.
In the case of already-deployed machines enlisted by MAAS, some of the possible actions may fail with unusual results, such as this exchange when attempting to turn off an already-deployed machine enlisted by MAAS:
$ maas admin machine power-off t8b7cw
Success.
Machine-readable output follows:
null
Note that the immediate return is Success, but the machine-readable output is null. After executing this command on an already-deployed machine, you should find that the deployed machine was not affected by the power-off command, since the power-type was set to manual. This is an expected behaviour.
You can change machine state, via the CLI, with the machine command, which offers the following options:
$ maas admin machine -h
usage: maas admin machine [-h] COMMAND ...

Manage an individual machine.

optional arguments:
  -h, --help            show this help message and exit

drill down:
  COMMAND
    details             Get system details
    power-parameters    Get power parameters
    set-workload-annotations
			Set key=value data
    set-owner-data      Deprecated, use set-workload-annotations.
    query-power-state   Get the power state of a node
    power-on            Turn on a node
    power-off           Power off a node
    test                Begin testing process for a node
    override-failed-testing
			Ignore failed tests
    abort               Abort a node operation
    deploy              Deploy a machine
    release             Release a machine
    commission          Commission a machine
    set-storage-layout  Change storage layout
    mount-special       Mount a special-purpose filesystem
    unmount-special     Unmount a special-purpose filesystem
    clear-default-gateways
			Clear set default gateways
    get-curtin-config   Get curtin configuration
    restore-networking-configuration
			Restore networking options
    restore-storage-configuration
			Restore storage configuration
    restore-default-configuration
			Restore default configuration
    mark-broken         Mark a machine as Broken
    mark-fixed          Mark a machine as Fixed
    rescue-mode         Enter rescue mode
    exit-rescue-mode    Exit rescue mode
    lock                Lock a machine
    unlock              Unlock a machine
    read                Read a node
    update              Update a machine
    delete              Delete a machine

A machine is identified by its system_id.
[/tabs]
For a better understanding of these states and actions, see Node statuses and Machine actions.
About enlistment
MAAS is built to manage machines, including the operating systems on those machines. Enlistment and commissioning are features that make it easier to start managing a machine – as long as that machine has been configured to netboot. Enlistment enables users to simply connect a machine, configure the firmware properly, and power it on so that MAAS can find it and add it.
Enlistment happens when MAAS starts; it reaches out on connected subnets to locate any nodes – that is, devices and machines – that reside on those subnets. MAAS finds a machine that’s configured to netboot (e.g., via PXE), boots that machine into Ubuntu, and then sends cloud-init user data which runs standard (i.e., built-in) commissioning scripts. The machine actually adds itself over the MAAS API, and then requests permission to send commissioning data.
Since MAAS doesn’t know whether you might intend to actually include these discovered machines in your cloud configuration, it won’t automatically take them over, but it will read them to get an idea how they’re set up. MAAS then presents these machines to you with a MAAS state of “New.” This allows you to examine them and decide whether or not you want MAAS to manage them.
When you configure a machine to netboot – and turn it on while connected to the network – MAAS will enlist it, giving it a status of “New.” You can also add a machine manually. In either case, the next step is commissioning, which boots the machine into an ephemeral Ubuntu kernel so that resource information can be gathered. You can also run custom commissioning scripts to meet your specific needs.
About the enlistment process
When MAAS enlists a machine, it first contacts the DHCP server, so that the machine can be assigned an IP address. An IP address is necessary to download a kernel and initrd via TFTP, since these functions can’t accept domain names. Once the machine has a bootable kernel, MAAS boots it:

Next, initrd mounts a Squashfs image, ephemerally via HTTP, so that cloud-init can execute:

Finally, cloud-init runs enlistment and setup scripts:

The enlistment scripts send information about the machine to the region API server, including the architecture, MAC address and other details. The API server, in turn, stores these details in the database. This information-gathering process is known as automatic discovery or network discovery.
Typically, the next step will be to commission the machine. As an alternative to enlistment, an administrator can add a machine manually. Typically this is done when enlistment doesn’t work for some reason. Note that when you manually add a machine, MAAS automatically commissions the machine as soon as you’ve added it.
After the commissioning process, MAAS places the machine in the ‘Ready’ state. ‘Ready’ is a holding state for machines that are commissioned, waiting to be deployed when needed.
MAAS runs built-in commissioning scripts during the enlistment phase. When you commission a machine, any customised commissioning scripts you add will have access to data collected during enlistment. Follow the link above for more information about commissioning and commission scripts.
About cloning machines
MAAS 3.1 provides the ability to quickly clone or copy configuration from one machine to one or more machines, via the MAAS UI, providing convenient access to an existing API feature… This is a step towards machine profile templating work.
Creating a machine profile is a repetitive task. Based on the responses to our survey – and multiple forum posts, we have learned that most users create multiple machines of the same configuration in batches. Some users create a machine profile template and loop them through the API, while some create a script to interface with the CLI. However, there is no easy way to do this in the UI except by going through each machine and configuring them individually.
MAAS API already has the cloning functionality, but it was never exposed in the UI. Hence, users may not know that this API feature exists, nor is there any current documentation about how to use this feature. Although the current cloning API feature does not solve all machine profile templating problems, it is a great place for us to start moving in the direction of machine templates.
About copying machine configurations
As a MAAS user – API or UI – you may want to copy the configuration of a given machine and apply it to multiple existing machines. Assuming that at least one machine is already set to the desired configuration, you should be able to apply these same settings to a list of destination machines. This means that a user should be able to:
- select the source machine to copy from.
- validate that the source machine exists.
- select at least 1 destination machine.
- validate that the destination machine(s) exist.
- edit the source machine or destination machines, if needed.
- know at all times which machines are affected.
- see the cloned machines when cloning is successful, or
- get clear failure information, if cloning fails.
About choosing configuration items to copy
As a MAAS user, you will likely want to select whether storage, network, or both configurations should be cloned. The cloning API allows users to choose interfaces and storage separately. Thus, this new feature should allow the user to:
- clone only the interface (network) configuration.
- clone only the storage configuration.
- clone both configurations.
About cloning restrictions
In order for cloning to succeed, a few restrictions must be met:
- The destination interface names must be the same source.
- The destination drive must be equal to or larger than the source drive.
- For static IPs, a new IP will be allocated to the interface on the destination machine
About enlisting deployed machines
In general, when adding a machine to MAAS, it network boots the machine into an ephemeral environment to collect hardware information about the machine. While this is not a destructive action, it doesn’t work if you have machines that are already running a workload.
For one, you might not be able to disrupt the workload in order to network boot it. But also, the machine would be marked as Ready, which is incorrect.
When adding a machine, you may specify that the machine is already deployed. In that case, it won’t be going through the normal commissioning process and will be marked as being deployed.
Such machines lack hardware information. In order to update the information, a script is provided to run a subset of the commissioning scripts and send them back to MAAS.
Some of the normal commands that work on deployed machines will not work on an already-deployed machine enlisted by MAAS.
Cloning machines is only available in MAAS versions 3.1 and greater.
About BMC enlistment
For IPMI machines, you only need to provide IPMI credentials. MAAS automatically discovers the machine and runs enlistment configuration by matching the BMC address. For non-IPMI machines, you must specify a non-PXE MAC address. MAAS automatically discovers the machine and runs enlistment configuration by matching the non-PXE MAC address.
About commissioning machines
When MAAS commissions a machine, the following sequence of events takes place:
- DHCP server is contacted
- kernel and initrd are received over TFTP
- machine boots
- initrd mounts a Squashfs image ephemerally over HTTP
- cloud-init runs built-in and custom commissioning scripts
- machine shuts down
The commissioning scripts will talk to the region API server to ensure that everything is in order and that eventual deployment will succeed.
MAAS chooses the latest Ubuntu LTS release as the default image for commissioning. If desired, you can select a different image in the “Settings” page of the web UI, by selecting the “General” tab and then scrolling down to the Commissioning section.
Commissioning requires 60 seconds.
About commissioning NUMA and SR-IOV nodes
If you are using the NUMA architecture, MAAS versions 2.7 and higher guarantee that machines are assigned to a single NUMA node that contains all the machine’s resources. Node boundaries are critical, especially in vNUMA situations. Splitting nodes can create unnecessary latency. You want the NUMA node boundaries to match VM boundaries if at all possible.
You must recommission NUMA/SR-IOV machines that were previously commissioned under version 2.6 or earlier.

When using these nodes, you can specify a node index for interfaces and physical block devices. MAAS will display the NUMA node index and details, depending upon your configuration, to include the count of NUMA nodes, number of CPU cores, memory, NICs, and node spaces for bonds and block devices. You can also filter machines by CPU cores, memory, subnet, VLAN, fabric, space, storage, and RAID, among others.
About MAAS commissioning scripts
MAAS runs scripts during enlistment, commissioning and testing to collect data about nodes. Both enlistment and commissioning run all builtin commissioning scripts, though enlistment runs only built-ins. Commissioning also runs any user-uploaded commissioning scripts by default, unless the user manually provides a list of scripts to run. MAAS uses these commissioning scripts to configure hardware and perform other tasks during commissioning, such as updating the firmware. Similarly, MAAS employs hardware testing scripts to evaluate system hardware and report its status.
Scripts can be selected to run from web UI during commissioning, by testing hardware, or from the command line. Note that MAAS only runs built-in commissioning scripts during enlistment. Custom scripts can be run when you explicitly choose to commission a machine. A typical administrator workflow (with machine states), using customised commissioning scripts, can be represented as:
Add machine -> Enlistment (runs built-in commissioning scripts MAAS) -> New -> Commission (runs built-in and custom commissioning scripts) -> Ready -> Deploy
NOTE: Scripts are run in alphabetical order in an ephemeral environment. We recommend running your scripts after any MAAS built-in scripts. This can be done by naming your scripts 99-z*. It is possible to reboot the system during commissioning using a script, however, as the environment is ephemeral, any changes to the environment will be destroyed upon reboot (barring, of course, firmware type updates).
When a machine boots, MAAS first instructs it to run cloud-init to set up SSH keys (during commissioning only), set up NTP, and execute a script that runs other commissioning scripts. Currently, the sequence of MAAS-provided commissioning scripts proceeds like this:
-
maas-support-info: MAAS gathers information that helps to identify and characterise the machine for debugging purposes, such as the kernel, versioning of various components, etc. Runs in parallel with other scripts.
-
maas-lshw: this script pulls system BIOS and vendor info, and generates user-defined tags for later use. Runs in parallel with other scripts.
-
20-maas-01-install-lldpd: this script installs the link layer discovery protocol (LLDP) daemon, which will later capture networking information about the machine. This script provides some extensive logging.
-
maas-list-modaliases: this script figures out what hardware modules are loaded, providing a way to autorun certain scripts based on which modules are loaded. Runs in parallel with other scripts.
-
20-maas-02-dhcp-unconfigured-ifaces: MAAS will want to know all the ways the machine is connected to the network. Only PXE comes online during boot; this script brings all the other networks online so they can be recognised. This script provides extensive logging.
-
maas-get-fruid-api-data: this script gathers information for the Facebook wedge power type. Runs in parallel with other scripts.
-
maas-serial-ports: this script lists what serial ports are available on the machine. Runs in parallel with other scripts.
As of MAAS version 3.0, 40-maas-01-network-interfaces is no longer used by MAAS.
- 40-maas-01-network-interfaces: this script is just used to get the IP address, which can then be associated with a VLAN/subnet.
- 50-maas-01-commissioning: this script is the main MAAS tool, gathering information on machine resources, such as storage, network devices, CPU, RAM, details about attached USB and PCI devices, etc. We currently pull this data using lxd: We use a Go binary built from lxd source that just contains the minimum source to gather the resource information we need. This script also checks whether the machine being commissioning is a virtual machine, which may affect how MAAS interacts with it.
- 50-maas-01-commissioning: this script is the main MAAS tool, gathering information on machine resources, such as storage, network devices, CPU, RAM, etc. We currently pull this data using lxd: We use a Go binary built from lxd source that just contains the minimum source to gather the resource information we need. This script also checks whether the machine being commissioning is a virtual machine, which may affect how MAAS interacts with it.
-
maas-capture-lldp: this script gathers LLDP network information to be presented on the logs page; this data is not used by MAAS at all. Runs in parallel with other scripts.
-
maas-kernel-cmdline: this script is used to update the boot devices; it double-checks that the right boot interface is selected.
Commissioning runs the same dozen or so scripts as enlistment, gathering all the same information, but with these seven caveats:
-
Commissioning also runs user-supplied commissioning scripts, if present. Be aware that these scripts run as root, so they can execute any system command.
-
Commissioning runs test scripts which are not run during enlistment.
-
Commissioning scripts can send BMC configuration data, and can be used to configure BMC data.
-
The environment variable BMC_CONFIG_PATH is passed to serially run commissioning scripts; these scripts may write BMC power credentials to BMC_CONFIG_PATH in YAML format, where each key is a power parameter. The first script to write BMC_CONFIG_PATH is the only script allowed to configure the BMC, allowing you to override MAAS’ built-in BMC detection. If the script returns 0, that value will be send to MAAS.
-
All built-in commissioning scripts have been migrated into the database.
-
maas-run-remote-scriptsis capable of enlisting machines, so enlistmentuser-datascripts have been removed. -
The metadata endpoints
http://<MAAS>:5240/<latest or 2012-03-01>/andhttp://<MAAS>:5240/<latest or 2012-03-01>/meta-data/are now available anonymously for use during enlistment.
In both enlistment and commissioning, MAAS uses either the MAC address or the UUID to identify machines. Currently, because some machine types encountered by MAAS do not use unique MAC addresses, we are trending toward using the UUID.
To commission a node, it must have a status of “New”.
You have the option of setting some parameters to change how commissioning runs:
-
enable_ssh: Optional integer. Controls whether to enable SSH for the commissioning environment using the user’s SSH key(s). ‘1’ == True, ‘0’ == False. Roughly equivalent to the Allow SSH access and prevent machine powering off in the web UI. -
skip_bmc_config: Optional integer. Controls whether to skip re-configuration of the BMC for IPMI based machines. ‘1’ == True, ‘0’ == False. -
skip_networking: Optional integer. Controls whether to skip re-configuring the networking on the machine after the commissioning has completed. ‘1’ == True, ‘0’ == False. Roughly equivalent to Retain network configuration in the web UI. -
skip_storage: Optional integer. Controls whether to skip re-configuring the storage on the machine after the commissioning has completed. ‘1’ == True, ‘0’ == False. Roughly equivalent to Retain storage configuration in the web UI. -
commissioning_scripts: Optional string. A comma separated list of commissioning script names and tags to be run. By default all custom commissioning scripts are run. Built-in commissioning scripts always run. Selectingupdate_firmwareorconfigure_hbawill run firmware updates or configure HBA’s on matching machines. -
testing_scripts: Optional string. A comma separated list of testing script names and tags to be run. By default all tests taggedcommissioningwill be run. Set tononeto disable running tests. -
parameters: Optional string. Scripts selected to run may define their own parameters. These parameters may be passed using the parameter name. Optionally a parameter may have the script name prepended to have that parameter only apply to that specific script.
About machine commissioning logs
MAAS keeps extensive logs of the commissioning process for each machine. These logs present an extremely detailed, timestamped record of completion and status items from the commissioning process.
About disabling individual boot methods
It is possible to disable individual boot methods. This must be done via the CLI. When a boot method is disabled MAAS will configure MAAS controlled isc-dhcpd to not respond to the associated boot architecture code. External DHCP servers must be configured manually.
To allow different boot methods to be in different states on separate physical networks using the same VLAN ID configuration is done on the subnet in the UI or API. When using the API boot methods to be disabled may be specified using the MAAS internal name or boot architecture code in octet or hex form.
For MAAS 3.0 and above, the following boot method changes have been implemented:
- UEFI AMD64 HTTP(00:10) has been re-enabled.
- UEFI ARM64 HTTP(00:13) has been enabled.
- UEFI ARM64 TFTP(00:0B) and UEFI ARM64 HTTP(00:13) will now provide a shim and GRUB signed with the Microsoft boot loader keys.
- grub.cfg for all UEFI platforms has been updated to replace the deprecated
linuxefiandinitrdeficommands with the standardlinuxandinitrdcommands. - GRUB debug may now be enabled by enabling rackd debug logging.
Disabling boot methods is available in MAAS version 3.0 or greater.
About automatic script selection by hardware type
When selecting multiple machines, scripts which declare the for_hardware field will only run on machines with matching hardware. To automatically run a script when ‘Update firmware’ or ‘Configure HBA’ is selected, you must tag the script with ‘update_firmware’ or ‘configure_hba’.
Similarly, scripts selected by tag on the command line which specify the for_hardware field will only run on matching hardware.
About script results
A script can output its results to a YAML file, and those results will be associated with the hardware type defined within the script. MAAS provides the path for the results file in an environment variable, RESULT_PATH. Scripts should write YAML to this file before exiting.
If the hardware type is storage, for example, and the script accepts a storage type parameter, the result will be associated with a specific storage device.
The YAML file must represent a dictionary with these two fields:
-
result: The completion status of the script. This status can bepassed,failed,degraded, orskipped. If no status is defined, an exit code of0indicates a pass while a non-zero value indicates a failure.
2.results: A dictionary of results. The key may map to a results key defined as embedded YAML within the script. The value of each result must be a string or a list of strings.
Optionally, a script may define what results to return in the YAML file in the metadata fields… The results field should contain a dictionary of dictionaries. The key for each dictionary is a name which is returned by the results YAML. Each dictionary may contain the following two fields:
-
title- The title for the result, used in the UI. -
description- The description of the field used as a tool-tip in the UI.
Here is an example of “degrade detection”:
#!/usr/bin/env python3

# --- Start MAAS 1.0 script metadata ---
# name: example
# results:
#   memspeed:
#     title: Memory Speed
#     description: Bandwidth speed of memory while performing random read writes
# --- End MAAS 1.0 script metadata ---

import os
import yaml

memspeed = some_test()

print('Memspeed: %s' % memspeed)
results = {
    'results': {
        'memspeed': memspeed,
    }
}
if memspeed < 100:
    print('WARN: Memory test passed but performance is low!')
    results['status'] = 'degraded'

result_path = os.environ.get("RESULT_PATH")
if result_path is not None:
    with open(result_path, 'w') as results_file:
        yaml.safe_dump(results, results_file)
About tags and scripts
As with general tag management, tags make scripts easier to manage; grouping scripts together for commissioning and testing, for example:
maas $PROFILE node-script add-tag $SCRIPT_NAME tag=$TAG
maas $PROFILE node-script remove-tag $SCRIPT_NAME tag=$TAG
MAAS runs all commissioning scripts by default. However, you can select which custom scripts to run during commissioning by name or tag:
maas $PROFILE machine commission \
 commissioning_scripts=$SCRIPT_NAME,$SCRIPT_TAG
You can also select which testing scripts to run by name or tag:
maas $PROFILE machine commission \
 testing_scripts=$SCRIPT_NAME,$SCRIPT_TAG
Any testing scripts tagged with commissioning will also run during commissioning.
About debugging script failures
You can individually access the output from both completed and failed scripts.

If you need further details, especially when writing and running your own scripts, you can connect to a machine and examine its logs and environment.
Because scripts operate within an ephemeral version of Ubuntu, enabling this option stops the machine from shutting down, allowing you to connect and probe a script’s status.
As long as you’ve added your SSH key to MAAS, you can connect with SSH to the machine’s IP with a username of ubuntu. Type sudo -i to get root access.
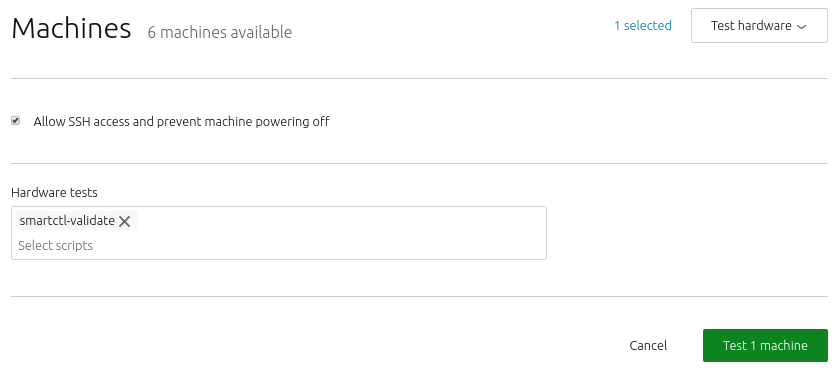
About testing hardware
If you wish, you can tell MAAS to test machine hardware using well-known Linux utilities. MAAS can test machines that have a status of Ready, Broken, or Deployed. You can include testing as part of the commissioning process. When you choose the ‘Commission’ action, MAAS will display the dialog described below. Be aware, though, that if the hardware tests fail, the machine will become unavailable for Deployment.
The majority of testing scripts only work with machines that are backed by physical hardware (e.g. they may be incompatible with VM-based machines).
With MAAS, you can easily write, upload and execute your hardware testing scripts and see the results.
About machine hardware & test logs
MAAS logs test results and allows you to view a summary of tests run against a particular machine. You can also example details on any particular tests:

You can also examine the “raw” log output:

Help interpreting these logs can be found under the Logging section of this documentation.
About testing machine networking
MAAS provides a comprehensive suite of network and link testing capabilities. MAAS can check whether or not links are connected, detect slow links, and report link and interface speeds via UI or API. In addition, you can test Internet connectivity against a user-provided list of URLs or IP addresses. Bonded NICS will be separated during this testing, so that each side of a redundant interface is fully evaluated.
Network testing also includes customisable network testing and commissioning scripts. There are no particular restrictions on these scripts, allowing you to test a wide variety of possible conditions and situations.
About post-commission configuration
Once commissioned, you can configure the machine’s network interface(s). Specifically, when a machine’s status is either “Ready” or “Broken”, interfaces can be added/removed, attached to a fabric and linked to a subnet, and provided an IP assignment mode. Tags can also be assigned to specific network interfaces.
About acquisition and deployment
Once a machine has been commissioned, the next logical step is to deploy it. Deploying a machine means, effectively, to install an operating system on it, along with any other application loads you wish to run on that machine.
Before deploying a machine, MAAS must acquire it (status ‘Allocated’). Acquiring (“allocating”) a machine reserves the machine for the exclusive use of the acquiring process. The machine is no longer available to any other process, including another MAAS instance, or a process such as Juju.
The agent that triggers deployment may vary. For instance, if the machines are destined to run complex, inter-related services that scale up or down frequently, like a “cloud” resource, then Juju is the recommended deployment agent. Juju will also install and configure services on the deployed machines. If you want to use MAAS to install a base operating system and work on the machines manually, then you can deploy a machine directly with MAAS.
Machines deployed with MAAS will also be ready to accept connections via SSH, to the ‘ubuntu’ user account. This connection assumes that you have imported an SSH key has to your MAAS account. This is explained in SSH keys.
Juju adds SSH keys to machines under its control.
MAAS also supports machine customisation with a process called “preseeding.” For more information about customising machines, see How to customise machines.
To deploy, you must configure the underlying machine to netboot. Such a machine will undergo the following process:
- DHCP server is contacted
- kernel and initrd are received over TFTP
- machine boots
- initrd mounts a Squashfs image ephemerally over HTTP
- cloud-init triggers deployment process
- curtin installation script runs
- Squashfs image (same as above) is placed on disk
The curtin installer uses an image-based method and is now the only installer used by MAAS. Although the older debian-installer method has been removed, curtin continues to support preseed files. For more information about customising machines see How to customise machines.
Before deploying, you should take two key actions:
-
Review and possibly set the Ubuntu kernels and the Kernel boot options that will get used by deployed machines.
-
Ensure any pertinent SSH keys are imported (see SSH keys) to MAAS so it can connect to deployed machines.
About machine event logs
Event logs display a list of timestamped status updates for events and actions performed on the machine:

Detailed discussion of this event log can be found under the Logging section of this documentation.
About adding machines
There are two ways to add a machine to MAAS:
-
If you place the machine on a connected network, and the machine is configured to netboot, MAAS will automatically enlist it.
-
If you add a machine manually, MAAS will automatically commission it. There are also ways to turn off this automatic commissioning, should you desire to do so.
MAAS typically adds a machine via a combination of DHCP, TFTP, and PXE. By now, you should have enabled MAAS to automatically add devices and machines to your environment. This unattended method of adding machines is called enlistment.
Configuring a computer to boot over PXE is done via its BIOS, often referred to as “netboot” or “network boot”. Normally, when you add a machine manually, MAAS will immediately attempt to commission the machine. Note that you will need to configure the underlying machine to netboot, or commissioning will fail. MAAS cannot handle this configuration for you. While the correct method for configuring network boot depends heavily on your server, there are two common elements:
-
The network card on your server must be able to support PXE, i.e., your NIC – whether independent or integrated on a motherboard – must have a boot PROM that supports network booting. You’ll need to consult the documentation for the machine in question to determine this. Note that in MAAS versions before 2.5, you are required to provide the MAC address of the PXE interface when adding a new machine manually.
-
You usually have to interrupt the boot process and enter the BIOS/UEFI menu to configure the network card’s PXE stack. Again, you may need to consult your machine’s documentation to pin down this step.
Additional steps will vary widely by machine type and architecture.
Regardless of how MAAS adds a machine, there are no special requirements for the underlying machine itself, other than being able to netboot. In particular, there is no need to install an operating system on it.
About the machine list
In the illustration below, you see the machine list for a typical small hospital data centre, including servers ready and allocated for functions like Pharmacy, Orders, Charts, and so on:

Rolling the cursor over status icons often reveals more details. For example, a failed hardware test script will place a warning icon alongside the hardware type tested by the script. Rolling the cursor over this will reveal which test failed. Likewise, you can find some immediate options by rolling over the column data items in the machines table.

The ‘Add hardware’ drop-down menu is used to add either new machines or a new chassis. This menu changes context when one or more machines are selected from the table, using either the individual checkboxes in the first column or the column title checkbox to select all.

With one or more machines selected, the ‘Add hardware’ drop-down menu moves to the left, and is joined by the ‘Take action’ menu. This menu provides access to the various machine actions that can be applied to the selected machine(s):

The ‘Filter by’ section limits the machines listed in the table to selected keywords and machine attributes.
FQDN               POWER  STATUS     OWNER  TAGS     POOL       NOTE     ZONE
----               -----  ------     -----  ----     ----       ----     ----
52-54-00-15-36-f2  off    Ready      -      Orders   Prescrbr   @md-all  Medications
52-54-00-17-64-c8  off    Ready      -      HRMgmt   StaffComp  @tmclck  Payroll
52-54-00-1d-47-95  off    Ready      -      MedSupp  SuppServ   @storag  Inventory
52-54-00-1e-06-41  off    Ready      -      PatPrtl  BusOfc     @bzstns  BizOffice
52-54-00-1e-a5-7e  off    Ready      -      Pharm    Prescrbr   @rxonly  Pharmacy
52-54-00-2e-b7-1e  off    Allocated  admin  NursOrd  NurServ    @nstns   Nursing
52-54-00-2e-c4-40  off    Allocated  admin  MedAdmn  NurServ    @rxonly  Nursing
52-54-00-2e-ee-17  off    Deployed   admin  Charts   ProServ    @md-all  Physician
You can generate a list similar to this for your machines with the command:
maas admin machines read | jq -r '(["FQDN","POWER","STATUS",
"OWNER", "TAGS", "POOL", "NOTE", "ZONE"] | (., map(length*"-"))),
(.[] | [.hostname, .power_state, .status_name, .owner // "-",
.tag_names[0] // "-", .pool.name, .description // "-", .zone.name]) | @tsv' | column -t
These example machines would typically be duplicated in several different geographies, with a quick way to switch to a redundant node, should anything go wrong (e.g., high availability). We used the word node there because, In the network language of MAAS, machines are one of several different types of nodes. A node is simply a network-connected object or, more specifically, an object that can independently communicate on a network. MAAS nodes include controllers, network devices, and of course, machines.
Looking back at the example above, you can see that there are several columns in the machine list, depending on your view:
- FQDN | MAC: The fully qualified domain name or the MAC address of the machine.
- Power: ‘On’, ‘Off’ or ‘Error’ to highlight an error state.
- Status: The current status of the machine, such as ‘Ready’, ‘Commissioning’ or ‘Failed testing’.
- Owner: The MAAS account responsible for the machine.
- Cores: The number of CPU cores detected on the machine.
- RAM: The amount of RAM, in GiB, discovered on the machine.
- Disks: The number of drives detected on the machine.
- Storage: The amount of storage, in GB, identified on the machine.
About the machine summary
Click a machine’s FQDN or MAC address to open a detailed view of a machine’s status and configuration.

The default view is ‘Machine summary’, presented as a series of cards detailing the CPU, memory, storage and tag characteristics of the machine, as well as an overview of its current status. When relevant, ‘Edit’ links take you directly to the settings pane for the configuration referenced within the card. The machine menu bar within the web UI also includes links to logs, events, and configuration options:

The machine status card presents an overview of CPU, memory, storage, tags, and general settings:
The first card presents some basics of the machine resources and configuration:

Here are some details on what this card presents, with details on in-card links described in following sections:
-
OVERVIEW the machine status (in this case “Deployed”), and lists OS version information.
-
CPU shows the specifics of the CPU(s), including a link to test the processor(s).
-
MEMORY gives the total available RAM for this machine, along with a test link.
-
STORAGE presents the total amount of storage available and the number of disks that provide that storage. There are two links here: one gives the storage layout (with the opportunity to change it for devices that are in ‘Ready’ or ‘Allocated’ states.
-
Owner identifies the owner of the machine.
-
Domain indicates the domain in which the machine exists.
-
Zone shows the AZ in which this machine resides, along with a link to edit the machine configuration (to change the AZ, if desired).
-
Resource pool shows the pool to which this machine has been assigned, and an edit link.
-
Power type gives the current power type, which links to the relevant edit form.
-
Tags presents the list of tags associated with this machine, editable via the link.
Note that clicking any of the links in this card will either present a pop-up form or take you to another item in the machine menu – so using the browser “back” button will take you completely away from this machine’s page. For example, you can choose the “Test CPU” option, which brings up this overlay:

From this screen, you can choose test scripts and run the tests (in the background) as the interface returns to the Machine summary. A linked note in the CPU block lets you know that the tests are in progress:

And you can watch the results under the “Tests” option in the Machine menu:

The rest of the cards on the Machine summary are either self-explanatory, or they’re covered in the sections below. The main point is this: You can see that nearly everything about machines takes place within the main menu’s “Machines” option.
Handling attached USB and PCI devices
The machines in your MAAS may have devices attached to them via USB or PCI interface, such as keyboards, cameras, network cards, GPUs, etc. MAAS will recognise these devices and make them visible to you when a machine is commissioned.
For example, the machine details presents USB and PCI devices like this:

Note that this page now includes two new tabs: “PCI devices” and “USB.” For each USB/PCI device attached to your machine, these tabs will list:
- device type
- vendor ID
- a product description
- a product ID
- the driver name
- the containing NUMA node (if any)
- the device address
A typical PCI device tab would look something like this:

The USB tab presents similar information in the same format.
If you are upgrading from a previous version of MAAS, PCI and USB devices aren’t modelled, so you will have to recommission the machine to capture these devices.
Once you’ve commissioned the machine, you have the option of deleting
PCI/USB devices from the machine in any machine state, via the CLI
only, using the following command:
maas $PROFILE node-device delete $SYSTEM_ID $DEVICE_ID
where:
- $PROFILE = your user profile (e.g., “admin”)
- $SYSTEM_ID = the ID of the machine in question (e.g., “ngx7ry”)
- $DEVICE_ID = the ID of the device you want to delete
If the device is still present in the system, it will be recognised again (and thus “recreated”)
when the machine is commissioned again.
About machine network info
The Network “tab” provides you with a way to view/edit the network and interface configuration for a machine:

In the case of this deployed machine, there are not many editing options. If the machine is in a ‘Ready’ state, though, altering the network configuration is possible, as shown in the screenshot above.
Options on this tab are described in the introduction to Networking article in this documentation set.
About machine configuration info
The final tab from the Machine menu allows you to update machine and power configuration options:

There are two sections to this tab. The “Machine configuration” section, shown above, offers some general parameters, mostly related to how this machine is grouped and categorised. More information on these options are found in the relevant sections of the documentation (e.g., tags, resource pools, and so forth).
The “Power configuration” supplies the parameters necessary for MAAS to access the machine to PXE-boot it:

More information on Power configuration will be found in the Power management section of this documentation.
USB and PCI devices are supported in MAAS version 3.0 and greater.
About resource pools
Resource pools allow administrators to logically group resources – machines and VM hosts – into pools. Pools can help you budget machines for a particular set of functions. For example, if you’re using MAAS to manage a hospital data centre, you may want to keep a certain number of machines reserved for provider use, whether that be for the charts, documentation, or orders application. You can use resource pools to reserve those machines, regardless of which of the three applications you end up loading onto a particular machine at any given time.
About tags
Tags are short, descriptive, searchable words that can be applied to various MAAS objects, including:
- machines (physical and virtual)
- VM hosts
- controllers (rack and region)
- storage (virtual and physical; block devices or partitions)
- network interfaces
- devices
- nodes (in the CLI only)
Tags serve to help you identify, group, and find objects easily, especially when you routinely deploy hundreds of machines.
About annotations
Annotations are descriptive, searchable phrases that apply only to machines. There are two types of annotations: static (always present in any machine state), and dynamic (only present in allocated or deployed states). Annotations help you identify, characterise, and inform others about your machines.
About storage
You have significant latitude when choosing the final storage configuration of a deployed machine. MAAS supports traditional disk partitioning, as well as more complex options such as LVM, RAID, and bcache. MAAS also supports UEFI as a boot mechanism. This article explains boot mechanisms and layouts, and offers some advice on how to configure layouts and manage storage.
A machine’s storage is dependant upon the underlying system’s disks, but its configuration (i.e., disk usage) is the result of a storage template. In MAAS, this template is called a layout, and MAAS applies it to a machine during commissioning. Once a layout is applied, a regular user can make modifications to a machine at the filesystem level to arrive at the machine’s final storage configuration. When a machine is no longer needed, a user can choose from among several disk erasure types before releasing it.
MAAS supports storage configuration for CentOS and RHEL deployments. Support includes RAID, LVM, and custom partitioning with different file systems (ZFS and bcache excluded). This support requires a newer version of Curtin, available as a PPA.
About machine storage info
The Storage tab on the machine list brings up a form that allows you to view/edit the file system, partitioning and storage parameters for the selected machine:

This tab describes the filesystem(s) in use, as well as the available and used partitions for this machine.
About block devices
Once the initial storage layout has been configured on a machine, you can perform many operations to view and adjust the entire storage layout for the machine. In MAAS there are two different types of block devices.
Physical
A physical block device is a physically attached block device such as a 100GB hard drive connected to a server.
Virtual
A virtual block device is a block device that is exposed by the Linux kernel when an operation is performed. Almost all the operations on a physical block device can be performed on a virtual block device, such as a RAID device exposed as md0.
About partitions
As with block devices (see Block devices), MAAS and the MAAS API offer a great deal of control over the creation, formatting, mounting and deletion of partitions.
About storage restrictions
There are three restrictions for the storage configuration:
- An EFI partition is required to be on the boot disk for UEFI.
- You cannot place partitions on logical volumes.
- You cannot use a logical volume as a Bcache backing device.
Violating these restrictions will prevent a successful deployment.
About VMFS datastores
MAAS can configure custom local VMware VMFS Datastore layouts to maximise the usage of your local disks when deploying VMware ESXi. As VMware ESXi requires specific partitions for operating system usage, you must first apply the VMFS6 storage layout. This layout creates a VMFS Datastore named datastore1 which uses the disk space left over on the boot disk after MAAS creates the operating system partitions.
About UEFI booting
Every layout type supports a machine booting with UEFI. In such a case, MAAS automatically creates an EFI boot partition (/boot/efi). Other than setting the machine to boot from UEFI, the user does not need to take any additional action.
Warning: UEFI must be enabled or disabled for the lifespan of the machine. For example, do not enlist a machine with UEFI enabled, and then disable it before commissioning. It won’t work!
The EFI partition, if created, will be the first partition (sda1) and will have a FAT32 filesystem with a size of 512 MB.
About final storage modifications
Once MAAS provisions a machine with block devices, via a layout or administrator customisation, a regular user can modify the resulting storage configuration at the filesystem level.
About disk erasure
Disk erasure pertains to the erasing of data on each of a machine’s disks when the machine has been released (see Release action) back into the pool of available machines. The user can choose from among three erasure types before confirming the Release action. A default erasure configuration can also be set.
About disk erasure types
The three disk erasure types are:
- Standard erasure
- Secure erasure
- Quick erasure
Each of these are explained below.
About standard erasure
Overwrites all data with zeros.
About secure erasure
Although effectively equivalent to Standard erase, Secure erase is much faster because the disk’s firmware performs the operation. Because of this, however, some disks may not be able to perform this erasure type (SCSI, SAS, and FC disks in particular).
About quick erasure
Same as Standard erase but only targets the first 1 MB and the last 1 MB of each disk. This removes the partition tables and/or superblock from the disk, making data recovery difficult but not impossible.
About erasure order of preference
If all three options are checked when the machine is released the following order of preference is applied:
- Use ‘secure erase’ if the disk supports it
- If it does not then use ‘quick erase’