
MAAS machines can be customised in a number of ways, including:
- machine storage.
- commissioning and deployment configurations (known as “pre-seeding”).
- custom Ubuntu kernels.
- kernel boot options.
- resource pools.
In this article, you can learn:
In short, this article will explain these possible customisations, and provide detailed instructions on how to customise your own machines as desired.
About customising machines
In this section, you’ll learn:
- About customising machine storage
- About pre-seeding (customising commissioning and deployment)
- About Ubuntu kernels
- About kernel boot options
- About resource pools
About customising machine storage
You have significant latitude when choosing the final storage configuration of a deployed machine. MAAS supports traditional disk partitioning, as well as more complex options such as LVM, RAID, and bcache. MAAS also supports UEFI as a boot mechanism. This article explains boot mechanisms and layouts, and offers some advice on how to configure layouts and manage storage.
A machine’s storage is dependant upon the underlying system’s disks, but its configuration (i.e., disk usage) is the result of a storage template. In MAAS, this template is called a layout, and MAAS applies it to a machine during commissioning. Once a layout is applied, a regular user can make modifications to a machine at the filesystem level to arrive at the machine’s final storage configuration. When a machine is no longer needed, a user can choose from among several disk erasure types before releasing it.
MAAS supports storage configuration for CentOS and RHEL deployments. Support includes RAID, LVM, and custom partitioning with different file systems (ZFS and bcache excluded). This support requires a newer version of Curtin, available as a PPA.
About UEFI booting
Every layout type supports a machine booting with UEFI. In such a case, MAAS automatically creates an EFI boot partition (/boot/efi). Other than setting the machine to boot from UEFI, the user does not need to take any additional action.
Warning: UEFI must be enabled or disabled for the lifespan of the machine. For example, do not enlist a machine with UEFI enabled, and then disable it before commissioning. It won’t work!
The EFI partition, if created, will be the first partition (sda1) and will have a FAT32 filesystem with a size of 512 MB.
About block devices
Once the initial storage layout has been configured on a machine, you can perform many operations to view and adjust the entire storage layout for the machine. In MAAS there are two different types of block devices.
Physical
A physical block device is a physically attached block device such as a 100GB hard drive connected to a server.
Virtual
A virtual block device is a block device that is exposed by the Linux kernel when an operation is performed. Almost all the operations on a physical block device can be performed on a virtual block device, such as a RAID device exposed as md0.
About partitions
As with block devices (see Block devices), MAAS and the MAAS API offer a great deal of control over the creation, formatting, mounting and deletion of partitions.
About storage restrictions
There are three restrictions for the storage configuration:
- An EFI partition is required to be on the boot disk for UEFI.
- You cannot place partitions on logical volumes.
- You cannot use a logical volume as a Bcache backing device.
Violating these restrictions will prevent a successful deployment.
About VMFS datastores
MAAS can configure custom local VMware VMFS Datastore layouts to maximise the usage of your local disks when deploying VMware ESXi. As VMware ESXi requires specific partitions for operating system usage, you must first apply the VMFS6 storage layout. This layout creates a VMFS Datastore named datastore1 which uses the disk space left over on the boot disk after MAAS creates the operating system partitions.
About final storage modifications
Once MAAS provisions a machine with block devices, via a layout or administrator customisation, a regular user can modify the resulting storage configuration at the filesystem level.
About disk erasure
Disk erasure pertains to the erasing of data on each of a machine’s disks when the machine has been released (see Release action) back into the pool of available machines. The user can choose from among three erasure types before confirming the Release action. A default erasure configuration can also be set.
About disk erasure types
The three disk erasure types are:
- Standard erasure - Overwrites all data with zeros.
- Secure erasure - Although effectively equivalent to Standard erase, Secure erase is much faster because the disk’s firmware performs the operation. Because of this, however, some disks may not be able to perform this erasure type (SCSI, SAS, and FC disks in particular).
- Quick erasure - Same as Standard erase but only targets the first 1 MB and the last 1 MB of each disk. This removes the partition tables and/or superblock from the disk, making data recovery difficult but not impossible.
If all three options are checked when the machine is released the following order of preference is applied:
- Use ‘secure erase’ if the disk supports it
- If it does not then use ‘quick erase’
It is very important to pay close attention to your selections when erasing disks.
About pre-seeding
During machine enlistment, deployment, commissioning and machine installation, MAAS sends Tempita-derived configuration files to the cloud-init process running on the target machine. MAAS refers to this process as preseeding. These preseed files are used to configure a machine’s ephemeral and installation environments and can be modified or augmented to a custom machine configuration.
Preseeding in MAAS can be achieved in two ways:
-
Curtin, a preseeding system similar to Kickstart or d-i (Debian Installer), applies customisation during operating system (OS) image installation. MAAS performs these changes on deployment, during OS installation, but before the machine reboots into the installed OS. Curtin customisations are perfect for administrators who want their deployments to have identical setups all the time, every time. This blog post contains an excellent high-level overview of custom MAAS installs using Curtin.
-
Cloud-init, a system for setting up machines immediately after instantiation. cloud-init applies customisations after the first boot, when MAAS changes a machine’s status to ‘Deployed.’ Customisations are per-instance, meaning that user-supplied scripts must be re-specified on redeployment. Cloud-init customisations are the best way for MAAS users to customise their deployments, similar to how the various cloud services prepare VMs when launching instances.
About templates
The Tempita template files are found in the /var/snap/maas/current/preseeds/ directory on the region controller. Each template uses a filename prefix that corresponds to a particular phase of MAAS machine deployment:
The Tempita template files are found in the /etc/maas/preseeds/ directory on the region controller. Each template uses a filename prefix that corresponds to a particular phase of MAAS machine deployment:
| Phase | Filename prefix |
|---|---|
| Enlistment | enlist |
| Commissioning | commissioning |
| Installation | curtin (Curtin) |
Additionally, the template for each phase typically consists of two files. The first is a higher-level file that often contains little more than a URL or a link to further credentials, while a second file contains the executable logic.
The enlist template, for example, contains only minimal variables, whereas enlist_userdata includes both user variables and initialisation logic.
Tempita’s inheritance mechanism is the reverse of what you might expect. Inherited files, such as enlist_userdata, become the new template which can then reference variables from the higher-level file, such as enlist.
About template naming
MAAS interprets templates in lexical order by their filename. This order allows for base configuration options and parameters to be overridden based on a combination of operating system, architecture, sub-architecture, release, and machine name.
Some earlier versions of MAAS only support Ubuntu. If the machine operating system is Ubuntu, then filenames without {os} will also be tried, to maintain backward compatibility.
Consequently, template files are interpreted in the following order:
-
{prefix}_{os}_{node_arch}_{node_subarch}_{release}_{node_name}or{prefix}_{node_arch}_{node_subarch}_{release}_{node_name} -
{prefix}_{os}_{node_arch}_{node_subarch}_{release}or{prefix}_{node_arch}_{node_subarch}_{release} -
{prefix}_{os}_{node_arch}_{node_subarch}or{prefix}_{node_arch}_{node_subarch} -
{prefix}_{os}_{node_arch}or{prefix}_{node_arch} -
{prefix}_{os} -
{prefix} -
generic
The machine needs to be the machine name, as shown in the web UI URL.
The prefix can be either enlist, enlist_userdata, commissioning, curtin, curtin_userdata or preseed_master. Alternatively, you can omit the prefix and the following underscore.
For example, to create a generic configuration template for Ubuntu 16.04 Xenial running on an x64 architecture, the file would need to be called ubuntu_amd64_generic_xenial_node.
To create the equivalent template for curtin_userdata, the file would be called curtin_userdata_ubuntu_amd64_generic_xenial_node.
Any file targeting a specific machine will replace the values and configuration held within any generic files. If those values are needed, you will need to copy these generic template values into your new file.
About Ubuntu kernels
MAAS supports four types of kernels for its Ubuntu machines:
- General availability kernels
- Hardware enablement kernels
- Hardware enablement kernels (pre-release)
- Low latency kernels
About general availability kernels
The general availability (GA) kernel is based on the generic kernel that ships with a new Ubuntu version. Subsequent fixes are applied regularly by the ‘stable’ stream used when setting up the global image source for MAAS.
MAAS denotes a GA kernel like this:
ga-<version>: The GA kernel reflects the major kernel version of the shipped Ubuntu release. For example, ‘ga-16.04’ is based on the ‘generic’ 4.4 Ubuntu kernel. As per Ubuntu policy, a GA kernel will never have its major version upgraded until the underlying release is upgraded.
About hardware enablement kernels
New hardware gets released all the time. If an Ubuntu host runs an older kernel, it’s unlikely that MAAS can support the hardware. Canonical does make every effort to back-port more recent kernels enabling more hardware. The acronym HWE stands for “Hardware Enablement.”
You also gain kernel improvements and new features when installing an HWE kernel.
There is the notion of an HWE stack, which refers to the window manager and kernel when the Ubuntu host is running a desktop environment. HWE stacks do not apply to MAAS since machines are provisioned strictly as non-graphical servers.
Note that these back-ported/HWE kernels are only available for LTS releases (e.g. Trusty, Xenial, etc.). For example, the first available HWE kernel for Ubuntu 16.04 LTS (Xenial) will be the GA kernel from Ubuntu 16.10 (Yakkety).
Before MAAS 2.1 on Xenial, HWE kernels are referred to by the notation hwe-<release letter>. So, to install the Yakkety HWE kernel on Xenial, the hwe-y kernel is used. By default, when using the web UI, MAAS imports all available HWE kernels along with its generic boot images. So if you are importing Trusty images, then the following HWE kernels are included: hwe-u, hwe-v, hwe-w, hwe-x (presuming the Xenial HWE kernel is available).
In MAAS 2.1, starting with Xenial kernels, the notation has changed. The following is used to refer to the latest HWE kernel available for Xenial: hwe-16.04.
See LTS Enablement Stack (Ubuntu wiki) for the latest information on HWE.
About pre-release hardware enablement kernels
The pre-release HWE kernel is known as the edge HWE kernel.
MAAS denotes the edge kernel like this: hwe-<version>-edge.
So ‘hwe-16.04’ is considered older than ‘hwe-16.04-edge’.
See Rolling LTS Enablement Stack (Ubuntu wiki) for more information.
About low latency kernels
The low-latency kernel is based on the GA kernel, but uses a more aggressive configuration to reduce latency. It is categorised as a soft real-time kernel. For more information, see Criteria for real-time computing (Wikipedia).
MAAS denotes a low latency kernel in three ways:
-
hwe-x-lowlatency: the Xenial low latency HWE kernel for Trusty -
ga-16.04-lowlatency: the low latency GA kernel for Xenial -
hwe-16.04-lowlatency: the low latency HWE kernel for Xenial
About choosing a kernel
The kernel installed on a machine during deployment is, by default, the Ubuntu release’s native kernel (GA). However, it is possible to tell MAAS to use a different kernel. Via the Web UI, MAAS can help you choose one of these kernels. There are three different contexts for your choice:
- globally (default minimum enlistment and commissioning kernel)
- per machine (minimum deploy kernel)
- per machine during deployment (specific deploy kernel)
About kernel boot options
MAAS can specify kernel boot options to machines on both a global basis (UI and CLI) and a per-machine basis (CLI-only). A full catalogue of available options can be found in the Linux kernel parameters list at kernel.org.
About resource pools
Resource pools allow administrators to logically group resources – machines and VM hosts – into pools. Pools can help you budget machines for a particular set of functions. For example, if you’re using MAAS to manage a hospital data centre, you may want to keep a certain number of machines reserved for provider use, whether that be for the charts, documentation, or orders application. You can use resource pools to reserve those machines, regardless of which of the three applications you end up loading onto a particular machine at any given time.
Administrators can manage resource pools on the Machines page in the web UI, under the Resource pools tab, or with the MAAS CLI. Also note that all MAAS installations have a resource pool named “default.” MAAS automatically adds new machines to the default resource pool.
How to customise machines
If you want to customise machines, you may want to know:
- How to customise machine storage
- How to pre-seed with curtin
- How to pre-seed with cloud-init
- How to choose Ubuntu kernels
- How to set global kernel boot options
- How to use resource pools
How to customise machine storage
This section will show you:
[tab version=“v3.2 Snap,v3.1 Snap,v3.0 Snap,v2.9 Snap,v3.2 Packages,v3.1 Packages,v3.0 Packages,v2.9 Packages” view=“CLI”]
- How to set global storage layouts
- How to set per-machine storage layouts
- How to erase disks
- How to specify conditional erasure types
- How to list block devices
- How to read a block device
- How to create a block device
- How to update a block device
- How to delete a block device
- How to format a block device
- How to unformat a block device
- How to mount a block device
- How to unmount a block device
- How to set a block device as a boot disk
- How to list partitions
- How to create a partition
- How to delete a partition
- How to format a partition
- How to unformat a partition
- How to mount a partition
- How to unmount a partition
- How to list VMFS datastores
- How to view a VMFS datastore
- How to create a VMFS datastore
- How to edit a VMFS datastore
- [How to delete a VMFS datastore](#heading–how-to-delete-a-vmfs-datas[/tab]
Note that layouts can be set globally and on a per-machine basis. For additional information on storage layouts, see the Storage layouts reference section at the end of this article.
How to set global storage layouts
All machines will have a default layout applied when commissioned. An administrator can configure the default layout on the ‘Settings’ page, under the ‘Storage’ tab.

All machines will have a default layout applied when commissioned. To set the default storage layout for all machines:
maas $PROFILE maas set-config name=default_storage_layout value=$LAYOUT_TYPE
For example, to set the default layout to Flat:
maas $PROFILE maas set-config name=default_storage_layout value=flat
Important: The new default will only apply to newly-commissioned machines.
Important: The new default will only apply to newly-commissioned machines.
How to set per-machine storage layouts
An administrator can change the layout for a single machine as well as customise that layout providing this is done while the machine has a status of ‘Ready’. This is only possible via the CLI: to see how, click the “CLI” option for your version and delivery method above.
An administrator can set a storage layout for a machine with a status of ‘Ready’ like this:
maas $PROFILE machine set-storage-layout $SYSTEM_ID storage_layout=$LAYOUT_TYPE [$OPTIONS]
For example, to set an LVM layout where the logical volume has a size of 5 GB:
maas $PROFILE machine set-storage-layout $SYSTEM_ID storage_layout=lvm lv_size=5368709120
You must specify all storage sizes in bytes.
This action will remove the configuration that may exist on any block device.
Only an administrator can modify storage at the block device level (providing the machine has a status of ‘Ready’).
How to set the default erasure configuration
A default erasure configuration can be set on the ‘Settings’ page by selecting the ‘Storage’ tab.
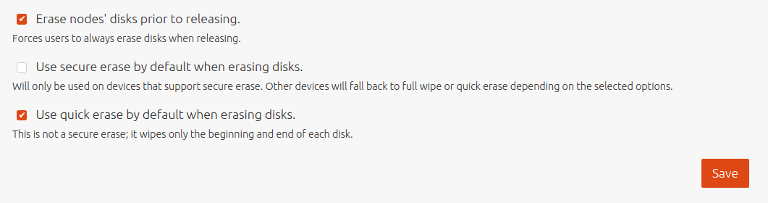
If option ‘Erase machines’ disks prior to releasing’ is chosen then users will be compelled to use disk erasure. That option will be pre-filled in the machine’s view and the user will be unable to remove the option.
With the above defaults, the machine’s view will look like this when the Release action is chosen:

Where ‘secure erase’ and ‘quick erase’ can then be configured by the user.
How to erase disks
When using the MAAS CLI, you can erase a disk when releasing an individual machine. Note that this option is not available when releasing multiple machines, so you’ll want to make sure you’re using:
maas $PROFILE machine release...
and not:
maas $PROFILE machines release...
Note the difference in singular and plural “machine/machines” in the commands. Releasing a machine requires that you have the system_id of the machine to be released, which you can obtain with a command like this one:
maas admin machines read | jq -r '(["HOSTNAME","SYSID","POWER","STATUS",
"OWNER", "TAGS", "POOL", "VLAN","FABRIC","SUBNET"] | (., map(length*"-"))),
(.[] | [.hostname, .system_id, .power_state, .status_name, .owner // "-",
.tag_names[0] // "-", .pool.name,
.boot_interface.vlan.name, .boot_interface.vlan.fabric,
.boot_interface.links[0].subnet.name]) | @tsv' | column -t

The basic form of the release command, when erasing disks on releasing, is:
Parameters secure_erase and quick_erase are both optional, although if you don’t specify either of them, the entire disk will be overwritten with null bytes. Note that this overwrite process is very slow.
Secure erasure uses the drive’s secure erase feature, if it has one. In some cases, this can be much faster than overwriting the entire drive. Be aware, though, that some drives implement secure erasure as a complete drive overwrite, so this method may still be very slow. Additionally, if you specify secure erasure and the drive doesn’t have this feature, you’ll get a complete overwrite anyway – again, possibly very slow.
Quick erasure wipes 2MB at the start and end of the drive to make recovery both inconvenient and unlikely to happen by accident. Note, though, that quick erasure is not secure.
How to specify conditional erasure types
If you specify both erasure types, like this:
maas $PROFILE machine release $SYSTEM_ID comment="some comment" erase=true secure_erase=true quick_erase=true
then MAAS will perform a secure erasure if the drive has that feature; if not, it will perform a quick erasure. Of course, if you’re concerned about completely erasing the drive, and you’re not sure whether the disk has secure erase features, the best way to handle that is to specify nothing, and allow the full disk to be overwritten by null bytes:
maas $PROFILE machine release $SYSTEM_ID comment="some comment" erase=true
How to list block devices
To view all block devices on a machine use the read operation. This list both physical and virtual block devices, as you can see in the output from the following command:
maas admin block-devices read <node-id>
Output:
Success.
Machine-readable output follows:
[
    {
        "id": 10,
        "path": "/dev/disk/by-dname/vda",
        "serial": "",
        "block_size": 4096,
        "available_size": 0,
        "resource_uri": "/MAAS/api/2.0/nodes/4y3h8a/blockdevices/10/",
        "filesystem": null,
        "id_path": "/dev/vda",
        "size": 5368709120,
        "partition_table_type": "MBR",
        "model": "",
        "type": "physical",
        "uuid": null,
        "used_size": 5365563392,
        "used_for": "MBR partitioned with 1 partition",
        "partitions": [
            {
                "bootable": false,
                "id": 9,
                "resource_uri":"/MAAS/api/2.0/nodes/4y3h8a/blockdevices/10/partition/9",
                "path": "/dev/disk/by-dname/vda-part1",
                "uuid": "aae082cd-8be0-4a64-ab49-e998abd6ea43",
                "used_for": "LVM volume for vgroot",
                "size": 5360320512,
                "type": "partition",
                "filesystem": {
                    "uuid": "a56ebfa6-8ef4-48b5-b6bc-9f9d27065d24",
                    "mount_options": null,
                    "label": null,
                    "fstype": "lvm-pv",
                    "mount_point": null
                }
            }
        ],
        "tags": [
            "rotary"
        ],
        "name": "vda"
    },
    {
        "id": 11,
        "path": "/dev/disk/by-dname/lvroot",
        "serial": null,
        "block_size": 4096,
        "available_size": 0,
        "resource_uri": "/MAAS/api/2.0/nodes/4y3h8a/blockdevices/11/",
        "filesystem": {
            "uuid": "7181a0c0-9e16-4276-8a55-c77364d137ca",
            "mount_options": null,
            "label": "root",
            "fstype": "ext4",
            "mount_point": "/"
        },
        "id_path": null,
        "size": 3221225472,
        "partition_table_type": null,
        "model": null,
        "type": "virtual",
        "uuid": "fc8ba89e-9149-412c-bcea-e596eb7c0d14",
        "used_size": 3221225472,
        "used_for": "ext4 formatted filesystem mounted at /",
        "partitions": [],
        "tags": [],
        "name": "vgroot-lvroot"
    }
]
How to read a block device
If you want to read just one block device instead of listing all block devices the read operation on the block device endpoint provides that information. To display the details on device ‘11’ from the previous output, for example, we could enter:
maas admin block-device read <node-id> 11
The above command generates the following output:
Success.
Machine-readable output follows:
{
    "available_size": 0,
    "path": "/dev/disk/by-dname/vgroot-lvroot",
    "name": "vgroot-lvroot",
    "used_for": "ext4 formatted filesystem mounted at /",
    "type": "virtual",
    "used_size": 3221225472,
    "filesystem": {
        "uuid": "7181a0c0-9e16-4276-8a55-c77364d137ca",
        "mount_point": "/",
        "mount_options": null,
        "fstype": "ext4",
        "label": "root"
    },
    "id_path": null,
    "id": 11,
    "partition_table_type": null,
    "block_size": 4096,
    "tags": [],
    "resource_uri": "/MAAS/api/2.0/nodes/4y3h8a/blockdevices/11/",
    "uuid": "fc8ba89e-9149-412c-bcea-e596eb7c0d14",
    "serial": null,
    "partitions": [],
    "size": 3221225472,
    "model": null
}
It is also possible to use the name of the block device, such as ‘sda’ or ‘vda’, instead of its ‘id’:
s admin block-device read <node-id> vda
MAAS allows the name of a block device to be changed. If the block device name has changed then the API call needs to use the new name.
Using the ID is safer as it never changes.
How to create a block device
MAAS gathers the required information itself on block devices when re- commissioning a machine. If this doesn’t provide the required information, it is also possible - though not recommended - for an administrator to use the API to manually add a physical block device to a machine.
maas admin block-devices create <node-id> name=vdb model="QEMU" serial="QM00001" size=21474836480 block_size=4096
Depending on your configuration, output should be similar to the following:
Success.
Machine-readable output follows:
{
    "available_size": 21474836480,
    "path": "/dev/disk/by-dname/vdb",
    "name": "vdb",
    "used_for": "Unused",
    "type": "physical",
    "used_size": 0,
    "filesystem": null,
    "id_path": "",
    "id": 12,
    "partition_table_type": null,
    "block_size": 4096,
    "tags": [],
    "resource_uri": "/MAAS/api/2.0/nodes/4y3h8a/blockdevices/12/",
    "uuid": null,
    "serial": "QM00001",
    "partitions": [],
    "size": 21474836480,
    "model": "QEMU"
}
The serial number is what MAAS will use when a machine is deployed to find the specific block device. It’s important that this be correct. In a rare chance that your block device does not provide a model or serial number you can provide an id_path. The id_path should be a path that is always the same, no matter the kernel version.
How to update a block device
An administrator can also update the details held on a physical block device, such as its name, from the API:
maas admin block-device update <node-id> 12 name=newroot
Output from this command will show that the ‘name’ has changed:
Success.
Machine-readable output follows:
{
    "block_size": 4096,
    "size": 21474836480,
    "filesystem": null,
    "model": "QEMU",
    "name": "newroot",
    "partitions": [],
    "tags": [],
    "used_size": 0,
    "path": "/dev/disk/by-dname/newroot",
    "id_path": "",
    "uuid": null,
    "available_size": 21474836480,
    "id": 12,
    "used_for": "Unused",
    "type": "physical",
    "resource_uri": "/MAAS/api/2.0/nodes/4y3h8a/blockdevices/12/",
    "partition_table_type": null,
    "serial": "QM00001"
}
How to delete a block device
Physical and virtual block devices can be deleted by an administrator, while ordinary users can only delete virtual block devices:
maas admin block-device delete <node-id> 12
How to format a block device
An entire block device can be formatted by defining a filesystem with the ‘format’ API call:
maas admin block-device format <node-id> 11 fstype=ext4
Successful output from this command will look similar to this:
Success.
Machine-readable output follows:
{
    "block_size": 4096,
    "size": 3221225472,
    "filesystem": {
        "label": "",
        "fstype": "ext4",
        "mount_options": null,
        "uuid": "75e42f49-9a45-466c-8425-87a40e4f4148",
        "mount_point": null
    },
    "model": null,
    "name": "vgroot-lvroot",
    "partitions": [],
    "tags": [],
    "used_size": 3221225472,
    "path": "/dev/disk/by-dname/vgroot-lvroot",
    "id_path": null,
    "uuid": "fc8ba89e-9149-412c-bcea-e596eb7c0d14",
    "available_size": 0,
    "id": 11,
    "used_for": "Unmounted ext4 formatted filesystem",
    "type": "virtual",
    "resource_uri": "/MAAS/api/2.0/nodes/4y3h8a/blockdevices/11/",
    "partition_table_type": null,
    "serial": null
}
You cannot format a block device that contains partitions or is used to make another virtual block device.
How to unformat a block device
You can remove the filesystem from a block device with the ‘unformat’ API call:
maas admin block-device unformat <node-id> 11
The output from this command should show the filesystem is now ‘null’:
Success.
Machine-readable output follows:
{
    "available_size": 3221225472,
    "path": "/dev/disk/by-dname/vgroot-lvroot",
    "name": "vgroot-lvroot",
    "used_for": "Unused",
    "type": "virtual",
    "used_size": 0,
    "filesystem": null,
    "id_path": null,
    "id": 11,
    "partition_table_type": null,
    "block_size": 4096,
    "tags": [],
    "resource_uri": "/MAAS/api/2.0/nodes/4y3h8a/blockdevices/11/",
    "uuid": "fc8ba89e-9149-412c-bcea-e596eb7c0d14",
    "serial": null,
    "partitions": [],
    "size": 3221225472,
    "model": null
}
How to mount a block device
If a block device has a filesystem, you can use the ‘maas’ command to mount a block devices at a given mount point:
maas admin block-device mount <node-id> 11 mount_point=/srv
The mount point is included in the successful output from the command:
Success.
Machine-readable output follows:
{
    "available_size": 0,
    "path": "/dev/disk/by-dname/vgroot-lvroot",
    "name": "vgroot-lvroot",
    "used_for": "ext4 formatted filesystem mounted at /srv",
    "type": "virtual",
    "used_size": 3221225472,
    "filesystem": {
        "uuid": "6f5965ad-49f7-42da-95ff-8000b739c39f",
        "mount_point": "/srv",
        "mount_options": "",
        "fstype": "ext4",
        "label": ""
    },
    "id_path": null,
    "id": 11,
    "partition_table_type": null,
    "block_size": 4096,
    "tags": [],
    "resource_uri": "/MAAS/api/2.0/nodes/4y3h8a/blockdevices/11/",
    "uuid": "fc8ba89e-9149-412c-bcea-e596eb7c0d14",
    "serial": null,
    "partitions": [],
    "size": 3221225472,
    "model": null
}
How to unmount a block device
To remove the mount point from the block device, use the ‘unmount’ call:
maas admin block-device unmount <node-id> 11 mount_point=/srv
The previous command will include a nullified ‘mount_point’ in its output:
Success.
Machine-readable output follows:
{
    "available_size": 0,
    "path": "/dev/disk/by-dname/vgroot-lvroot",
    "name": "vgroot-lvroot",
    "used_for": "Unmounted ext4 formatted filesystem",
    "type": "virtual",
    "used_size": 3221225472,
    "filesystem": {
        "uuid": "6f5965ad-49f7-42da-95ff-8000b739c39f",
        "mount_point": null,
        "mount_options": null,
        "fstype": "ext4",
        "label": ""
    },
    "id_path": null,
    "id": 11,
    "partition_table_type": null,
    "block_size": 4096,
    "tags": [],
    "resource_uri": "/MAAS/api/2.0/nodes/4y3h8a/blockdevices/11/",
    "uuid": "fc8ba89e-9149-412c-bcea-e596eb7c0d14",
    "serial": null,
    "partitions": [],
    "size": 3221225472,
    "model": null
}
How to set a block device as a boot disk
By default, MAAS picks the first added block device to the machine as the boot disk. In most cases this works as expected as the BIOS usually enumerates the boot disk as the first block device. There are cases where this fails and the boot disk needs to be set to another disk. This API allow setting which block device on a machine MAAS should use as the boot disk.:
maas admin block-device set-boot-disk <node-id> 10
Only an administrator can set which block device should be used as the boot disk and only a physical block device can be set as as the boot disk. This operation should be done before a machine is acquired or the storage layout will be applied to the previous boot disk.
How to list partitions
To view all the partitions on a block device, use the ‘partitions read’ API call:
maas admin partitions read <node-id> 10
Success.
Machine-readable output follows:
[
    {
        "bootable": false,
        "id": 9,
        "resource_uri":
"/MAAS/api/2.0/nodes/4y3h8a/blockdevices/10/partition/9",
        "path": "/dev/disk/by-dname/vda-part1",
        "uuid": "aae082cd-8be0-4a64-ab49-e998abd6ea43",
        "used_for": "LVM volume for vgroot",
        "size": 5360320512,
        "type": "partition",
        "filesystem": {
            "uuid": "a56ebfa6-8ef4-48b5-b6bc-9f9d27065d24",
            "mount_options": null,
            "label": null,
            "fstype": "lvm-pv",
            "mount_point": null
        }
    }
]
To view the metadata for a specific partition on a block device, rather than all partitions, use the singular ‘partition’ API call with an endpoint:
maas admin partition read <node-id> 10 9
How to create a partition
To create a new partition on a block device, use the ‘create’ API call:
maas admin partitions create <node-id> 10 size=5360320512
In addition to bytes, as shown above, the ‘size’ of a partition can also be defined with a ‘G’ for gigabytes or ‘M’ for megabytes. The output from the previous command will look like this:
Success.
Machine-readable output follows:
{
    "bootable": false,
    "path": "/dev/disk/by-dname/vda-part1",
    "filesystem": null,
    "used_for": "Unused",
    "type": "partition",
    "id": 10,
    "size": 5360320512,
    "resource_uri": "/MAAS/api/2.0/nodes/4y3h8a/blockdevices/10/partition/10",
    "uuid": "3d32adbf-9943-4785-ab38-963758338c6c"
}
How to delete a partition
Partitions can be deleted from a block device with the ‘delete’ API call. Make sure you double check the partition details as the partition is deleted immediately, with no further confirmation:
maas admin partition delete <node-id> 10 9
Successful output from the ‘delete’ command will look like this:
Success.
Machine-readable output follows:
How to format a partition
Partitions can be formatted in a similar way to block devices:
maas admin partition format <node-id> 10 9 fstype=ext4
The output from the ‘format’ command will be similar to the following:
Success.
Machine-readable output follows:
{
    "id": 9,
    "used_for": "Unmounted ext4 formatted filesystem",
    "resource_uri": "/MAAS/api/2.0/nodes/4y3h8a/blockdevices/10/partition/9",
    "path": "/dev/disk/by-dname/vda-part1",
    "uuid": "aae082cd-8be0-4a64-ab49-e998abd6ea43",
    "size": 5360320512,
    "bootable": false,
    "type": "partition",
    "filesystem": {
        "uuid": "ea593366-be43-4ea3-b2d5-0adf82085a62",
        "mount_point": null,
        "mount_options": null,
        "fstype": "ext4",
        "label": ""
    }
}
You cannot format partitions that are used to make another virtual block device.
How to unformat a partition
You can also remove the filesystem from a partition with the ‘unformat’ API call:
maas admin partition unformat <node-id> 10 10 fstype=ext4
Success.
Machine-readable output follows:
{
    "bootable": false,
    "path": "/dev/disk/by-dname/vda-part1",
    "filesystem": null,
    "used_for": "Unused",
    "type": "partition",
    "id": 10,
    "size": 5360320512,
    "resource_uri": "/MAAS/api/2.0/nodes/4y3h8a/blockdevices/10/partition/10",
    "uuid": "3d32adbf-9943-4785-ab38-963758338c6c"
}
How to mount a partition
A formatted partition can be mounted at a given mount point with the ‘mount’ command.
maas admin partition mount <node-id> 10 10 mount_point=/srv
The mount point and the filesystem is visible in the output from the command:
Success.
Machine-readable output follows:
{
    "bootable": false,
    "id": 10,
    "resource_uri": "/MAAS/api/2.0/nodes/4y3h8a/blockdevices/10/partition/10",
    "path": "/dev/disk/by-dname/vda-part1",
    "uuid": "3d32adbf-9943-4785-ab38-963758338c6c",
    "used_for": "ext4 formatted filesystem mounted at /srv",
    "size": 5360320512,
    "type": "partition",
    "filesystem": {
        "uuid": "1949a5fb-f7bd-4ada-8ba5-d06d3f5857a8",
        "mount_options": "",
        "label": "",
        "fstype": "ext4",
        "mount_point": "/srv"
    }
}
How to unmount a partition
A previous mounted partition can be unmounted with the ‘unmount’ command:
maas admin partition unmount 4y3h8a 10 10
After successfully running this command, the mount point will show as ‘null’ in the output:
Success.
Machine-readable output follows:
{
    "bootable": false,
    "id": 10,
    "resource_uri": "/MAAS/api/2.0/nodes/4y3h8a/blockdevices/10/partition/10",
    "path": "/dev/disk/by-dname/vda-part1",
    "uuid": "3d32adbf-9943-4785-ab38-963758338c6c",
    "used_for": "Unmounted ext4 formatted filesystem",
    "size": 5360320512,
    "type": "partition",
    "filesystem": {
        "uuid": "1949a5fb-f7bd-4ada-8ba5-d06d3f5857a8",
        "mount_options": null,
        "label": "",
        "fstype": "ext4",
        "mount_point": null
    }
    "type": "partition",
    "id": 3,
    "size": 2000003072
}
How to list VMFS datastores
To view all VMFS Datastores on a machine, use the ‘vmfs-datastores read’ API call:
maas $PROFILE vmfs-datastores read $SYSTEM_ID
[
    {
        "human_size": "45.8 GB",
        "filesystem": {
            "fstype": "vmfs6",
            "mount_point": "/vmfs/volumes/datastore1"
        },
        "uuid": "2779a745-1db3-4fd7-b06e-455b728fffd4",
        "name": "datastore1",
        "system_id": "4qxaga",
        "devices": [
            {
                "uuid": "c55fe657-689d-4570-8492-683dd5fa1c40",
                "size": 35026632704,
                "bootable": false,
                "tags": [],
                "used_for": "VMFS extent for datastore1",
                "filesystem": {
                    "fstype": "vmfs6",
                    "label": null,
                    "uuid": "55ac6422-68b5-440e-ba65-153032605b51",
                    "mount_point": null,
                    "mount_options": null
                },
                "type": "partition",
                "device_id": 5,
                "path": "/dev/disk/by-dname/sda-part3",
                "system_id": "4qxaga",
                "id": 71,
                "resource_uri": "/MAAS/api/2.0/nodes/4qxaga/blockdevices/5/partition/71"
            },
            {
                "uuid": "5182e503-4ad4-446e-9660-fd5052b41cc5",
                "size": 10729029632,
                "bootable": false,
                "tags": [],
                "used_for": "VMFS extent for datastore1",
                "filesystem": {
                    "fstype": "vmfs6",
                    "label": null,
                    "uuid": "a5949b18-d591-4627-be94-346d0fdaf816",
                    "mount_point": null,
                    "mount_options": null
                },
                "type": "partition",
                "device_id": 6,
                "path": "/dev/disk/by-dname/sdb-part1",
                "system_id": "4qxaga",
                "id": 77,
                "resource_uri": "/MAAS/api/2.0/nodes/4qxaga/blockdevices/6/partition/77"
            }
        ],
        "id": 17,
        "size": 45755662336,
        "resource_uri": "/MAAS/api/2.0/nodes/4qxaga/vmfs-datastore/17/"
    }
]
How to view a VMFS datastore
To view a specific VMFS Datastores on a machine, use the ‘vmfs-datastore read’ API call:
maas $PROFILE vmfs-datastore read $SYSTEM_ID $VMFS_DATASTORE_ID
{
    "uuid": "fb6fedc2-f711-40de-ab83-77eddc3e19ac",
    "name": "datastore1",
    "system_id": "b66fn6",
    "id": 18,
    "filesystem": {
        "fstype": "vmfs6",
        "mount_point": "/vmfs/volumes/datastore1"
    },
    "human_size": "2.8 GB",
    "devices": [
        {
            "uuid": "b91df576-ba02-4acb-914f-03ba9a2865b7",
            "size": 2814377984,
            "bootable": false,
            "tags": [],
            "system_id": "b66fn6",
            "used_for": "VMFS extent for datastore1",
            "type": "partition",
            "id": 80,
            "filesystem": {
                "fstype": "vmfs6",
                "label": null,
                "uuid": "4a098d71-1e59-4b5f-932d-fc30a1c0dc96",
                "mount_point": null,
                "mount_options": null
            },
            "device_id": 1,
            "path": "/dev/disk/by-dname/vda-part3",
            "resource_uri": "/MAAS/api/2.0/nodes/b66fn6/blockdevices/1/partition/80"
        }
    ],
    "size": 2814377984,
    "resource_uri": "/MAAS/api/2.0/nodes/b66fn6/vmfs-datastore/18/"
}
How to create a VMFS datastore
A VMware VMFS datastore is created on one or more block devices or partitions.
To create a VMFS Datastores on a machine use the ‘vmfs-datastores create’ API call:
maas $PROFILE vmfs-datastores create $SYSTEM_ID name=$VMFS_NAME block_devices=$BLOCK_ID_1,$BLOCK_ID_2 partitions=$PARTITION_ID_1,$PARTITION_ID_2
{
    "system_id": "b66fn6",
    "devices": [
        {
            "uuid": "b91df576-ba02-4acb-914f-03ba9a2865b7",
            "size": 2814377984,
            "bootable": false,
            "tags": [],
            "device_id": 1,
            "system_id": "b66fn6",
            "type": "partition",
            "used_for": "VMFS extent for datastore42",
            "filesystem": {
                "fstype": "vmfs6",
                "label": null,
                "uuid": "fc374367-a2fb-4e50-9377-768bfe9705b6",
                "mount_point": null,
                "mount_options": null
            },
            "path": "/dev/disk/by-dname/vda-part3",
            "id": 80,
            "resource_uri": "/MAAS/api/2.0/nodes/b66fn6/blockdevices/1/partition/80"
        }
    ],
    "name": "datastore42",
    "filesystem": {
        "fstype": "vmfs6",
        "mount_point": "/vmfs/volumes/datastore42"
    },
    "id": 19,
    "size": 2814377984,
    "uuid": "2711566c-2df4-4cc4-8c06-7392bb1f9532",
    "human_size": "2.8 GB",
    "resource_uri": "/MAAS/api/2.0/nodes/b66fn6/vmfs-datastore/19/"
}
How to edit a VMFS datastore
To edit an existing VMFS Datastores on a machine use the ‘vmfs-datastore update’ API call:
maas $PROFILE vmfs-datastore update $SYSTEM_ID $VMFS_ID name=$NEW_VMFS_NAME add_block_devices=$NEW_BLOCK_ID_1,$NEW_BLOCK_ID_2 add_partitions=$NEW_PARTITION_ID_1,$NEW_PARTITION_ID_2 remove_partitions=$EXISTING_PARTITION_ID1,$EXISTING_PARTITION_ID2
{
    "uuid": "2711566c-2df4-4cc4-8c06-7392bb1f9532",
    "name": "datastore42",
    "system_id": "b66fn6",
    "id": 19,
    "filesystem": {
        "fstype": "vmfs6",
        "mount_point": "/vmfs/volumes/datastore42"
    },
    "human_size": "13.5 GB",
    "devices": [
        {
            "uuid": "b91df576-ba02-4acb-914f-03ba9a2865b7",
            "size": 2814377984,
            "bootable": false,
            "tags": [],
            "system_id": "b66fn6",
            "used_for": "VMFS extent for datastore42",
            "type": "partition",
            "id": 80,
            "filesystem": {
                "fstype": "vmfs6",
                "label": null,
                "uuid": "fc374367-a2fb-4e50-9377-768bfe9705b6",
                "mount_point": null,
                "mount_options": null
            },
            "device_id": 1,
            "path": "/dev/disk/by-dname/vda-part3",
            "resource_uri": "/MAAS/api/2.0/nodes/b66fn6/blockdevices/1/partition/80"
        },
        {
            "uuid": "f21fe54e-b5b1-4562-ab6b-e699e99f002f",
            "size": 10729029632,
            "bootable": false,
            "tags": [],
            "system_id": "b66fn6",
            "used_for": "VMFS extent for datastore42",
            "type": "partition",
            "id": 86,
            "filesystem": {
                "fstype": "vmfs6",
                "label": null,
                "uuid": "f3d9b6a3-bab3-4677-becb-bf5a421bfcc2",
                "mount_point": null,
                "mount_options": null
            },
            "device_id": 2,
            "path": "/dev/disk/by-dname/vdb-part1",
            "resource_uri": "/MAAS/api/2.0/nodes/b66fn6/blockdevices/2/partition/86"
        }
    ],
    "size": 13543407616,
    "resource_uri": "/MAAS/api/2.0/nodes/b66fn6/vmfs-datastore/19/"
}
How to delete a VMFS datastore
To delete a VMFS Datastores on a machine use the ‘vmfs-datastore delete’ API call:
maas $PROFILE vmfs-datastore delete $SYSTEM_ID $VMFS_ID
How to pre-seed with curtin
You can customise the Curtin installation by either editing the existing curtin_userdata template or by adding a custom file as described above.
Curtin provides hooks to execute custom code before and after installation takes place. These hooks are named early and late respectively, and they can both be overridden to execute the Curtin configuration in the ephemeral environment. Additionally, the late hook can be used to execute a configuration for a machine being installed, a state known as in-target.
Curtin commands look like this:
foo: ["command", "--command-arg", "command-arg-value"]
Each component of the given command makes up an item in an array. Note, however, that the following won’t work:
foo: ["sh", "-c", "/bin/echo", "foobar"]
This syntax won’t work because the value of sh's -c argument is itself an entire command. The correct way to express this is:
foo: ["sh", "-c", "/bin/echo foobar"]
The following is an example of an early command that will run before the installation takes place in the ephemeral environment. The command pings an external machine to signal that the installation is about to start:
early_commands:
  signal: ["wget", "--no-proxy", "http://example.com/", "--post-data", "system_id=&signal=starting_install", "-O", "/dev/null"]
The following is an example of two late commands that run after installation is complete. Both run in-target, on the machine being installed.
The first command adds a PPA to the machine. The second command creates a file containing the machine’s system ID:
late_commands:
  add_repo: ["curtin", "in-target", "--", "add-apt-repository", "-y", "ppa:my/ppa"]
  custom: ["curtin", "in-target", "--", "sh", "-c", "/bin/echo -en 'Installed ' > /tmp/maas_system_id"]
How to pre-seed with cloud-init
It’s easy to customise cloud-init via the web UI. When you’ve selected a machine and choose ‘Take action >> Deploy,’ you’ll be presented with the following screen:

Select a viable release (in this case, “Ubuntu 18.04…”) and check the box labelled “Cloud-init user-data…”:

Paste the desired script directly into the box, and select “Start deployment for machine.” For example, to import an SSH key immediately after your machine deployment, you could paste this script:
#!/bin/bash
(
echo === $date ===
ssh-import-id foobar_user
) | tee /ssh-key-import.log
No script validation of any kind is provided with this capability. You will need to test and debug your own cloud-init scripts.
Using cloud-init to customise a machine after deployment is relatively easy. After you’re logged in, use the following command to deploy a machine with a custom script you’ve written:
maas $PROFILE machine deploy $SYSTEM_ID user_data=<base-64-encoded-script>
The three replaceable parameters shown above decode to:
-
$PROFILE: Your MAAS login. E.g.admin -
$SYSTEM_ID: The machine’s system ID (see example below) -
<base-64-encoded-script>: A base-64 encoded copy of your customisation script. See below for an example.
E.g.:
Suppose you would like to import an SSH key immediately after your machine deployment. First, you want to find the machine’s system_id, which you can do with this short, command-line jq script:
maas admin machines read | jq -r '(["HOSTNAME","SYSID"] | (., map(length*"-"))),
(.[] | [.hostname, .system_id]) | @tsv' | column -t
You might then use this script, called import_key.sh, to retrieve the needed key:
#!/bin/bash
(
echo === $date ===
ssh-import-id foobar_user
) | tee /ssh-key-import.log
This script echos the date in addition to the output of the ssh-import-key command. It also adds that output to a file, /ssh-key-import.log.
Base-64 encoding is required because the MAAS command-line interacts with the MAAS API, and base-64 encoding allows MAAS to send the script inside a POST HTTP command.
Use the base64 command to output a base-64 encoded version of your script:
base64 -w0 ./import_key.sh
Putting it together:
maas $PROFILE machine deploy $SYSTEM_ID user_data=$(base64 -w0 ./import_key.sh)
After MAAS deploys the machine, you’ll find /ssh-key-import.log on the machine you deployed.
How to choose Ubuntu kernels
This section will show you:
- How to set a default minimum kernel for enlistment and commissioning
- How to set a minimum deployment kernel for a machine
- How to set a specific kernel during machine deployment
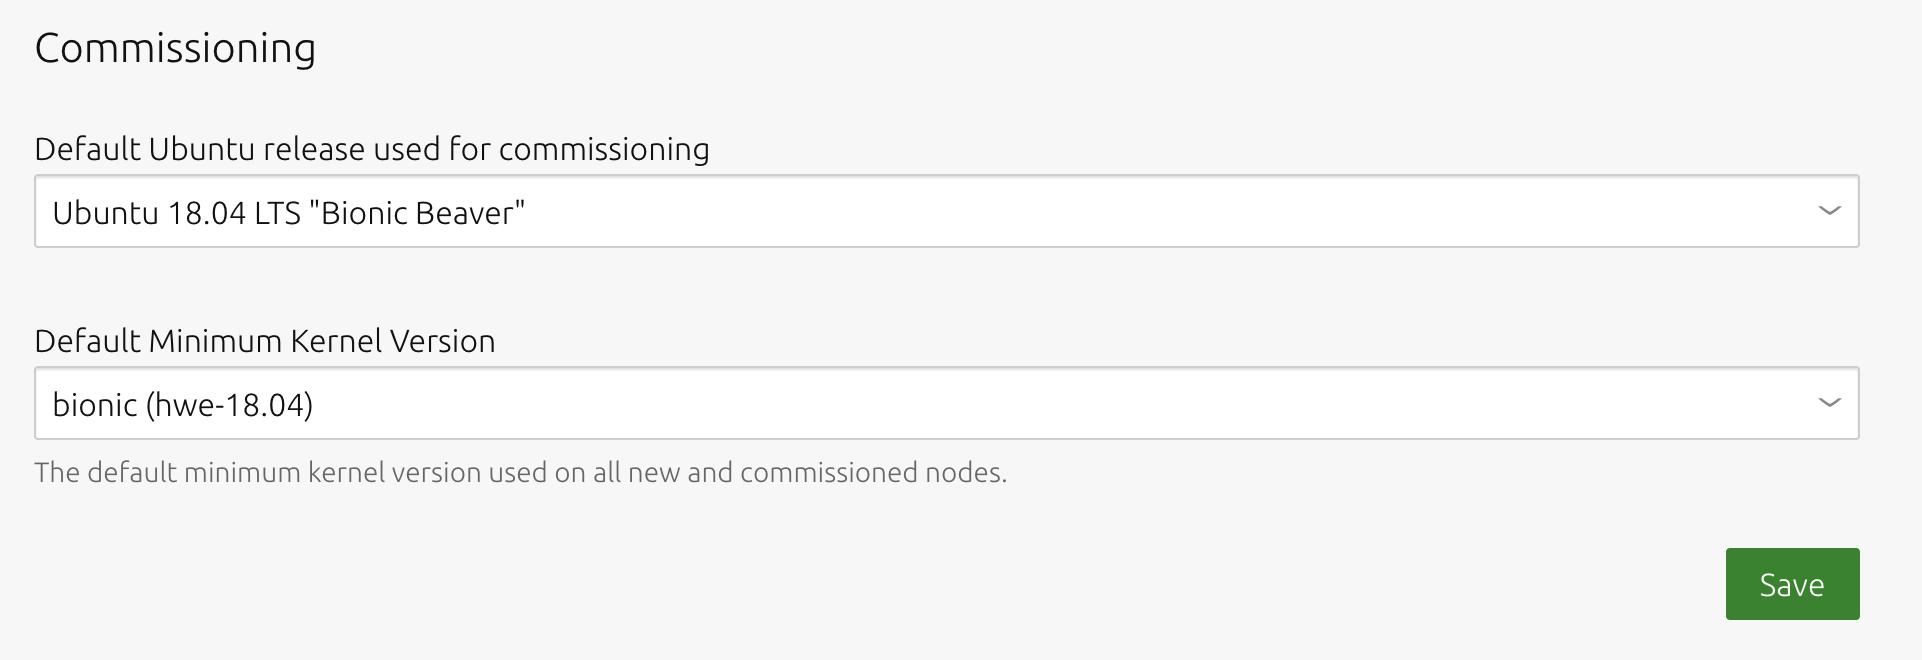
How to set a default minimum kernel for enlistment and commissioning
To set the default minimum enlistment and commissioning kernel (based on Ubuntu release: GA kernel) for all machines visit the ‘General’ tab of the ‘Settings’ page and select a kernel in the ‘Default Minimum Kernel Version’ field of the Commissioning section. Don’t forget to click ‘Save’.
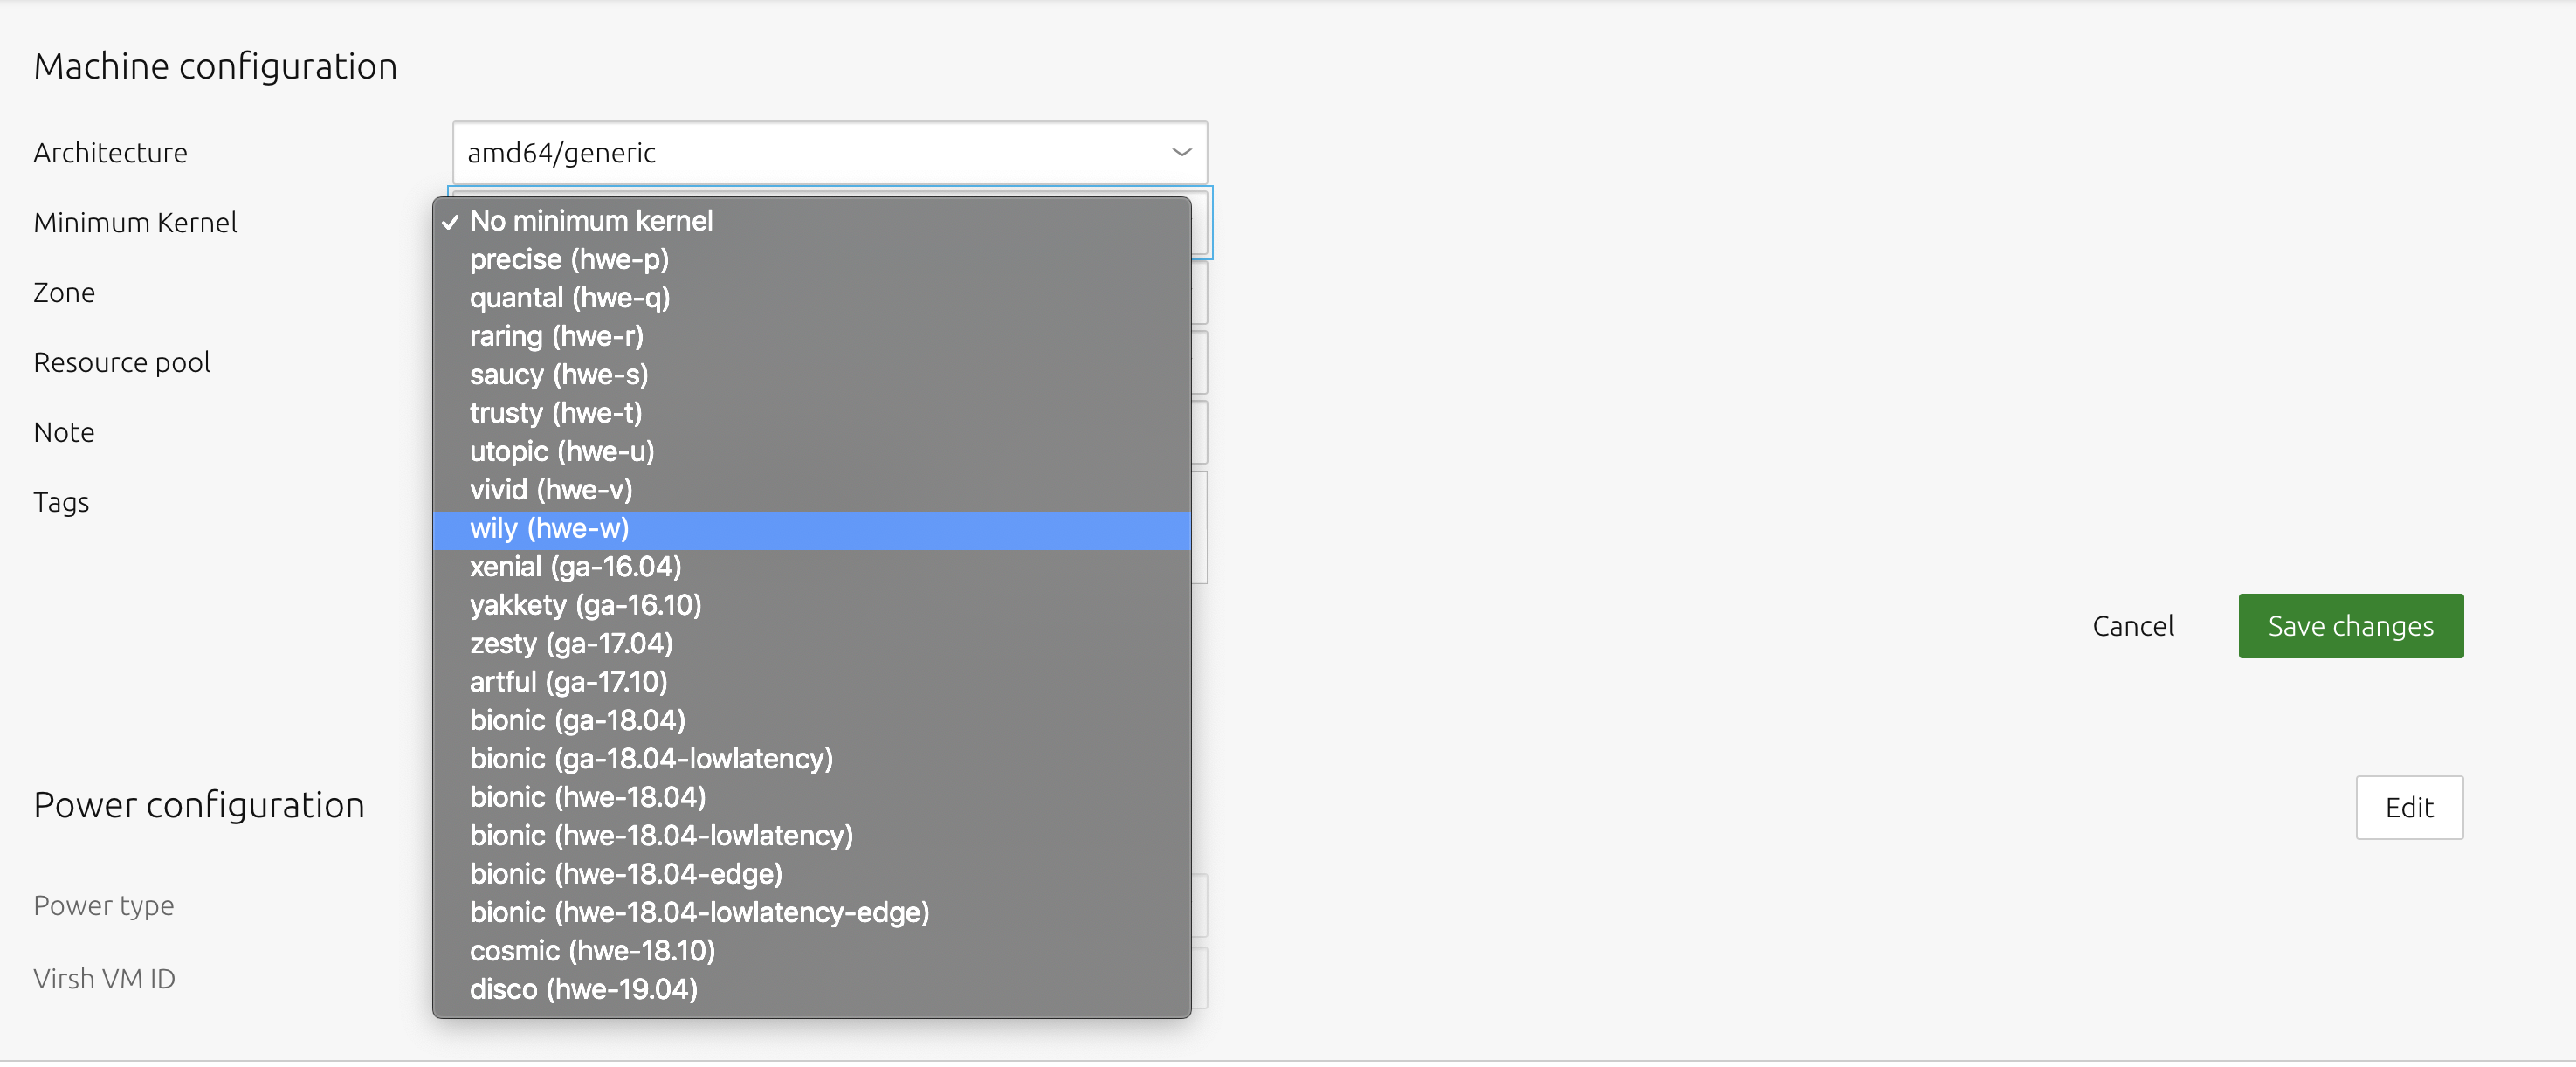
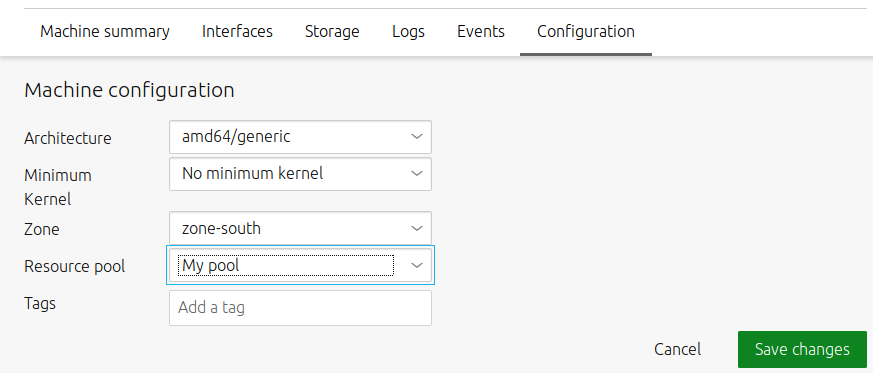
How to set a minimum deployment kernel for a machine
To set the minimum deploy kernel on a machine basis, click on a machine from the ‘Machines’ page of the web UI and switch to its ‘Configuration’ page. Click ‘Edit’ in the ‘Machine configuration’ section, select a kernel in the ‘Minimum Kernel’ field followed by ‘Save changes’.
How to set a specific kernel during machine deployment
To set a specific kernel during deployment, select a machine from the ‘Machines’ page and choose ‘Deploy’ under ‘Take action’. Then choose a kernel from the (third) kernel field. Hit ‘Deploy machine’ to initiate the deployment.

MAAS verifies that the specified kernel is available for the given Ubuntu release (series) before deploying the machine.
To set a default minimum kernel for all new and commissioned machines:
maas $PROFILE maas set-config name=default_min_hwe_kernel value=$KERNEL
For example, to set it to the 16.04 GA kernel:
maas $PROFILE maas set-config name=default_min_hwe_kernel value=ga-16.04
The command option default_min_hwe_kernel appears to apply to only HWE kernels but this is not the case.
How to set a minimum deployment kernel for a machine
To set the minimum deploy kernel on a per-machine basis:
maas $PROFILE machine update $SYSTEM_ID min_hwe_kernel=$HWE_KERNEL
For example, to set it to the HWE 16.04 kernel:
maas $PROFILE machine update $SYSTEM_ID min_hwe_kernel=hwe-16.04
The command option default_min_hwe_kernel appears to apply to only HWE kernels but this is not the case.
How to set a specific kernel during machine deployment
To set a specific kernel during the deployment of a machine:
maas $PROFILE machine deploy $SYSTEM_ID distro_series=$SERIES hwe_kernel=$KERNEL
The operation will fail if the kernel specified by hwe_kernel is older than the kernel (possibly) given by default_min_hwe_kernel. Similarly, it will not work if the kernel is not available for the given distro series (such as ‘hwe-16.10’ for ‘xenial’).
For example, to deploy a Xenial node with the HWE 16.04 edge kernel:
maas $PROFILE machine deploy $SYSTEM_ID distro_series=xenial hwe_kernel=hwe-16.04-edge
The command option hwe_kernel appears to apply to only HWE kernels but this is not the case.
How to set global kernel boot options
To set kernel boot options globally, as an admin, open the ‘Settings’ page and on the ‘General’ tab scroll down to the ‘Global Kernel Parameters’ section:

Type in the desired (space separated) options and click ‘Save’. The contents of the field will be used as-is. Do not use extra characters.
You can set kernel boot options and apply them to all machines with the CLI command:
maas $PROFILE maas set-config name=kernel_opts value='$KERNEL_OPTIONS'
See How can I set kernel boot options for a specific machine? to set per-machine kernel boot options.
How to use resource pools
This section will explain:
- How to add a resource pool
- How to delete a resource pool
- How to add a node to a resource pool
- How to remove a node from a resource pool
- How to add a VM host to a resource pool
- How to remove a VM host from a resource pool
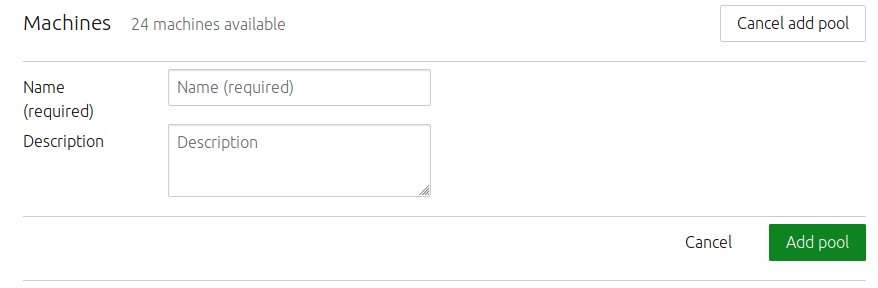
How to add a resource pool
Use the Add pool button to add a new resource pool.
After giving your new pool a name and description, click the Add pool button:
How to delete a resource pool
To delete a resource pool, click the trashcan icon next to the pool.
![]()
If you delete a resource pool, all machines that belong to that resource pool will return to the default pool.
How to add a machine to a resource pool
To add a machine to a resource pool, on the Machines page, select the machine you want to add to the resource pool. Next, select the Configuration tab. Now select the resource pool and click the Save changes button.
How to remove a machine from a resource pool
To remove a machine from a resource pool, follow the same procedure you would use to add a machine, but select “default” as the new resource pool. This action will return the machine to the default resource pool.
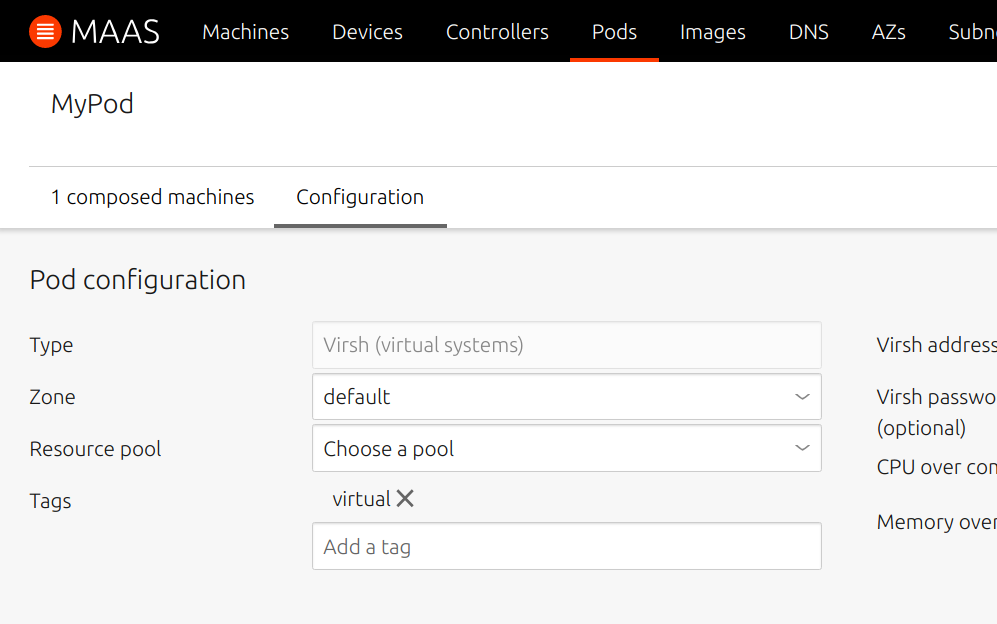
How to add a VM host to a resource pool
You can add a VM host to a resource pool when you create a new VM host, or you can edit a VM host’s configuration:
How to remove a VM host from a resource pool
To remove a VM host from a resource pool, follow the same procedure you would use to add a VM host to a resource pool, except select “default” as the new resource pool. This action will return the machine to the default resource pool.
- How to create a resource pool
- How to list available resource pools
- How to list a single resource pool
- How to update a resource pool
- How to delete a resource pool
- How to add a machine to a resource pool
How to create a resource pool
Here’s an example that demonstrates how to create a new resource pool named myresource.
maas $PROFILE resource-pools create name=myresource description="A new resource pool."
The description field is optional.
How to list available resource pools
maas $PROFILE resource-pools read
How to list a single resource pool
maas $PROFILE resource-pool read $RESOURCE_POOL_ID
How to update a resource pool
maas $PROFILE resource-pool update $RESOURCE_POOL_ID name=newname description="A new description."
The name and description fields are optional.
How to delete a resource pool
maas $PROFILE resource-pool delete $RESOURCE_POOL_ID
How to add a machine to a resource pool
maas $PROFILE machine update $SYSTEM_ID pool=$POOL_NAME
Storage layouts reference
There are three layout types:
- Flat layout
- LVM layout
- bcache layout
The layout descriptions below will include the EFI partition. If your system is not using UEFI, regard sda2 as sda1 (with an additional 512 MB available to it).
Flat layout storage reference
With the Flat layout, a partition spans the entire boot disk. The partition is formatted with the ext4 filesystem and uses the / mount point:
| Name | Size | Type | Filesystem | Mount point |
|---|---|---|---|---|
| sda | - | disk | ||
| sda1 | 512 MB | part | FAT32 | /boot/efi |
| sda2 | rest of sda | part | ext4 | / |
The following three options are supported:
-
boot_size: Size of the boot partition on the boot disk. Default is 0, meaning not to create the boot partition. The ‘/boot’ will be placed on the root filesystem. -
root_device: The block device on which to place the root partition. The default is the boot disk. -
root_size: Size of the root partition. Default is 100%, meaning the entire size of the root device.
LVM storage layout reference
The LVM layout creates the volume group vgroot on a partition that spans the entire boot disk. A logical volume lvroot is created for the full size of the volume group; is formatted with the ext4 filesystem; and uses the / mount point:
| Name | Size | Type | Filesystem | Mount point |
|---|---|---|---|---|
| sda | - | disk | ||
| sda1 | 512 MB | part | FAT32 | /boot/efi |
| sda2 | rest of sda | part | lvm-pv(vgroot) | |
| lvroot | rest of sda | lvm | ext4 | / |
| vgroot | rest of sda | lvm |
The following six options are supported:
-
boot_size: Size of the boot partition on the boot disk. Default is 0, meaning not to create the boot partition. The ‘/boot’ will be placed on the root filesystem. -
root_device: The block device on which to place the root partition. The default is the boot disk. -
root_size: Size of the root partition. Default is 100%, meaning the entire size of the root device. -
vg_name: Name of the created volume group. Default isvgroot. -
lv_name: Name of the created logical volume. Default islvroot. -
lv_size: Size of the created logical volume. Default is 100%, meaning the entire size of the volume group.
bcache storage layout reference
A bcache layout will create a partition that spans the entire boot disk as the backing device. It uses the smallest block device tagged with ‘ssd’ as the cache device. The bcache device is formatted with the ext4 filesystem and uses the / mount point. If there are no ‘ssd’ tagged block devices on the machine, then the bcache device will not be created, and the Flat layout will be used instead:
| Name | Size | Type | Filesystem | Mount point |
|---|---|---|---|---|
| sda | - | disk | ||
| sda1 | 512 MB | part | FAT32 | /boot/efi |
| sda2 | rest of sda | part | bc-backing | |
| sdb (ssd) | - | disk | ||
| sdb1 | 100% of sdb | part | bc-cache | |
| bcache0 | per sda2 | disk | ext4 | / |
The following seven options are supported:
-
boot_size: Size of the boot partition on the boot disk. Default is 0, meaning not to create the boot partition. The ‘/boot’ will be placed on the root filesystem. -
root_device: The block device upon which to place the root partition. The default is the boot disk. -
root_size: Size of the root partition. Default is 100%, meaning the entire size of the root device. -
cache_device: The block device to use as the cache device. Default is the smallest block device tagged ssd. -
cache_mode: The cache mode to which MAAS should set the created bcache device. The default iswritethrough. -
cache_size: The size of the partition on the cache device. Default is 100%, meaning the entire size of the cache device. -
cache_no_part: Whether or not to create a partition on the cache device. Default is false, meaning to create a partition using the givencache_size. If set to true, no partition will be created, and the raw cache device will be used as the cache.
VMFS6 storage layout reference
The VMFS6 layout is used for VMware ESXi deployments only. It is required when configuring VMware VMFS Datastores. This layout creates all operating system partitions, in addition to the default datastore. The datastore may be modified. New datastores may be created or extended to include other storage devices. The base operating system partitions may not be modified because VMware ESXi requires them. Once applied another storage layout must be applied to remove the operating system partitions.
| Name | Size | Type | Use |
|---|---|---|---|
| sda | - | disk | |
| sda1 | 3 MB | part | EFI |
| sda2 | 4 GB | part | Basic Data |
| sda3 | Remaining | part | VMFS Datastore 1 |
| sda4 | - | skipped | |
| sda5 | 249 MB | part | Basic Data |
| sda6 | 249 MB | part | Basic Data |
| sda7 | 109 MB | part | VMware Diagnostic |
| sda8 | 285 MB | part | Basic Data |
| sda9 | 2.5 GB | part | VMware Diagnostic |
The following options are supported:
-
root_device: The block device upon which to place the root partition. Default is the boot disk. -
root_size: Size of the default VMFS Datastore. Default is 100%, meaning the remaining size of the root disk.
Blank storage layout reference
The blank layout removes all storage configuration from all storage devices. It is useful when needing to apply a custom storage configuration.
Warning: Machines with the blank layout applied are not deployable; you must first configure storage manually.